Jumble - Wishlist Setup Docs
“Jumble - Wishlist Setup Docs” Documentation by “WP Plugin Experts”Introduction
Jumble - Woocommerce / WordPress Wishlist Collection & Bookmark
Hence you can now bookmark any page or blog post you like or even create your wishlist of your preferred products using this single plugin.
Features:
- Customers / Readers
- Quickly add a custom post types / products to a wishlist, and create new wishlist without leaving the post / product's page
- Create an unlimited number of wishlist. Guest users can store a Wishlist for 30 days (or until cookies are cleared). Registered users can store wishlist indefinitely
- Privacy controls. Users can either create a public or private Wishlist. Public wishlist can be shared and are viewable by anyone. Private wishlist are only viewable to the user.
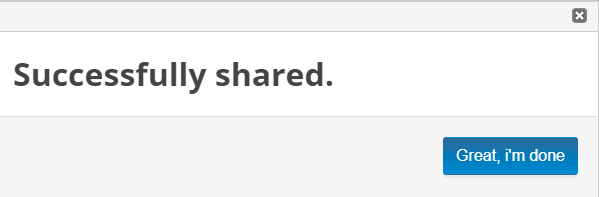
- Share wishlists to various social networks via a unique short url. Facebook, Twitter and LinkedIn.
- Share wishlists via email to your friends and family.
- Shop Managers / Authors
- View and manage your customer's / reader's wishlists from the WordPress admin.
- Show a plain text link or button.
- Choose from 5 different icons (works with both plain text link or button) or have no icon at all.
- Disable guests from creating wishlists.
- Ability to set any wishlist as featured wishlist.
- Easily modify the text for the "add to wishlist" link.
- Enable only the social sharing services that your customers can share to.
- Supports both pretty/non pretty permalinks.
- Manage sort order of wishlists and wishlist items via drag & drop interface from the WordPress admin.NEW
- Developers
- Extremely flexible layout. Use any page on your website to display a user's wishlists, display individual wishlists, to edit wishlists, or to create new wishlist.
- Wishlist, Light Box, Watch List, Collection or Want List. Easily change the terminology.
- Fully localized/translation-ready. Easily translate and use the plugin in your native language.
- Super flexible links. Create your own add to wishlist buttons with a simple function call and arguments.
- Easily customize the different pages by copying the templates into your child theme's woocommerce/woocommerce-wishlists folder.
- Easily customize the CSS and/or fonts by copying into your child theme's woocommerce/woocommerce-wishlists folder.
- Easily change the various messages displayed throughout the plugin from 1 simple filter.
- Easily move the icon to the right of the add to wishlist text by using 1 simple filter.
- Easily change the size of all add to wishlist links (plain or button) by using 1 simple filter, or by creating your own link and passing in a size.
Installing the Plugin
- The installation of the plugin is just like any other plugin installation for WordPress. Login to your WordPress site and go to Plugins > Add New.
- At the Install Plugins Page click on Upload from the top navigation and then click on browse.
- Go to the location on your computer where you saved the downloaded plugin zip file and upload this zipped file. You need to unzip the file first to get the plugin zip file.
- Now click on Install Now.
- Wait until WordPress has uploaded the file. If it's done click on Activate Plugin.
- Now you should see a message 'Plugin activated' at the top of the window.
After installing the extension, a Wishlists section will be added to the WordPress sidebar menu.
The Plugin Settings
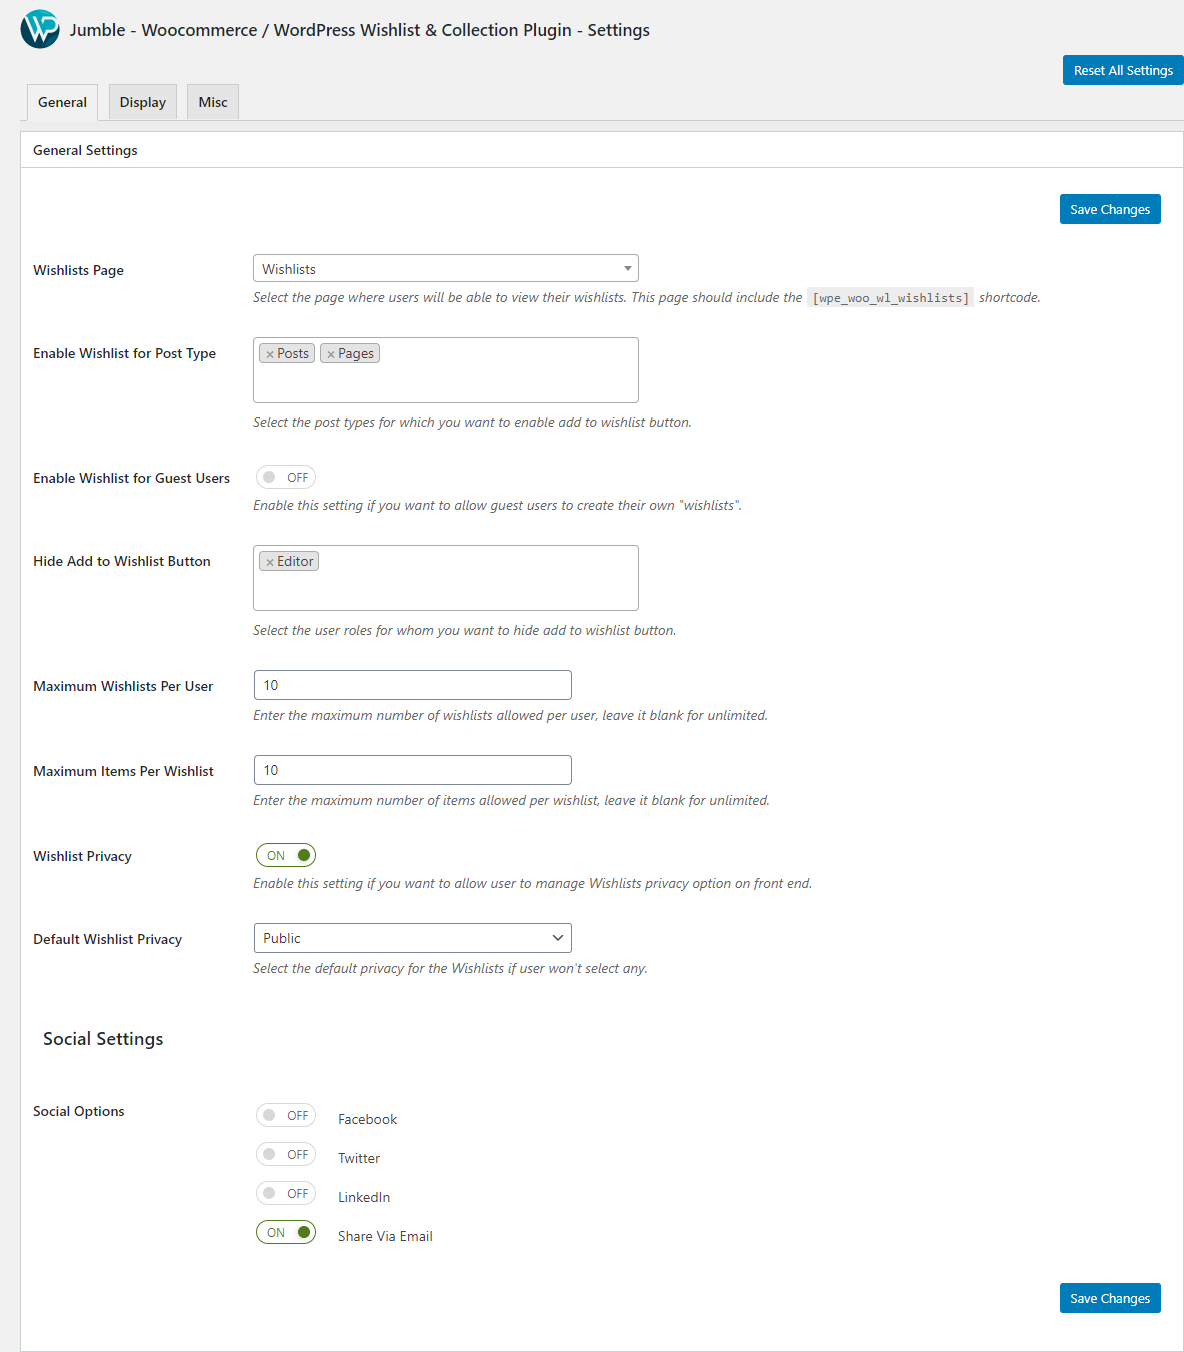
General Settings
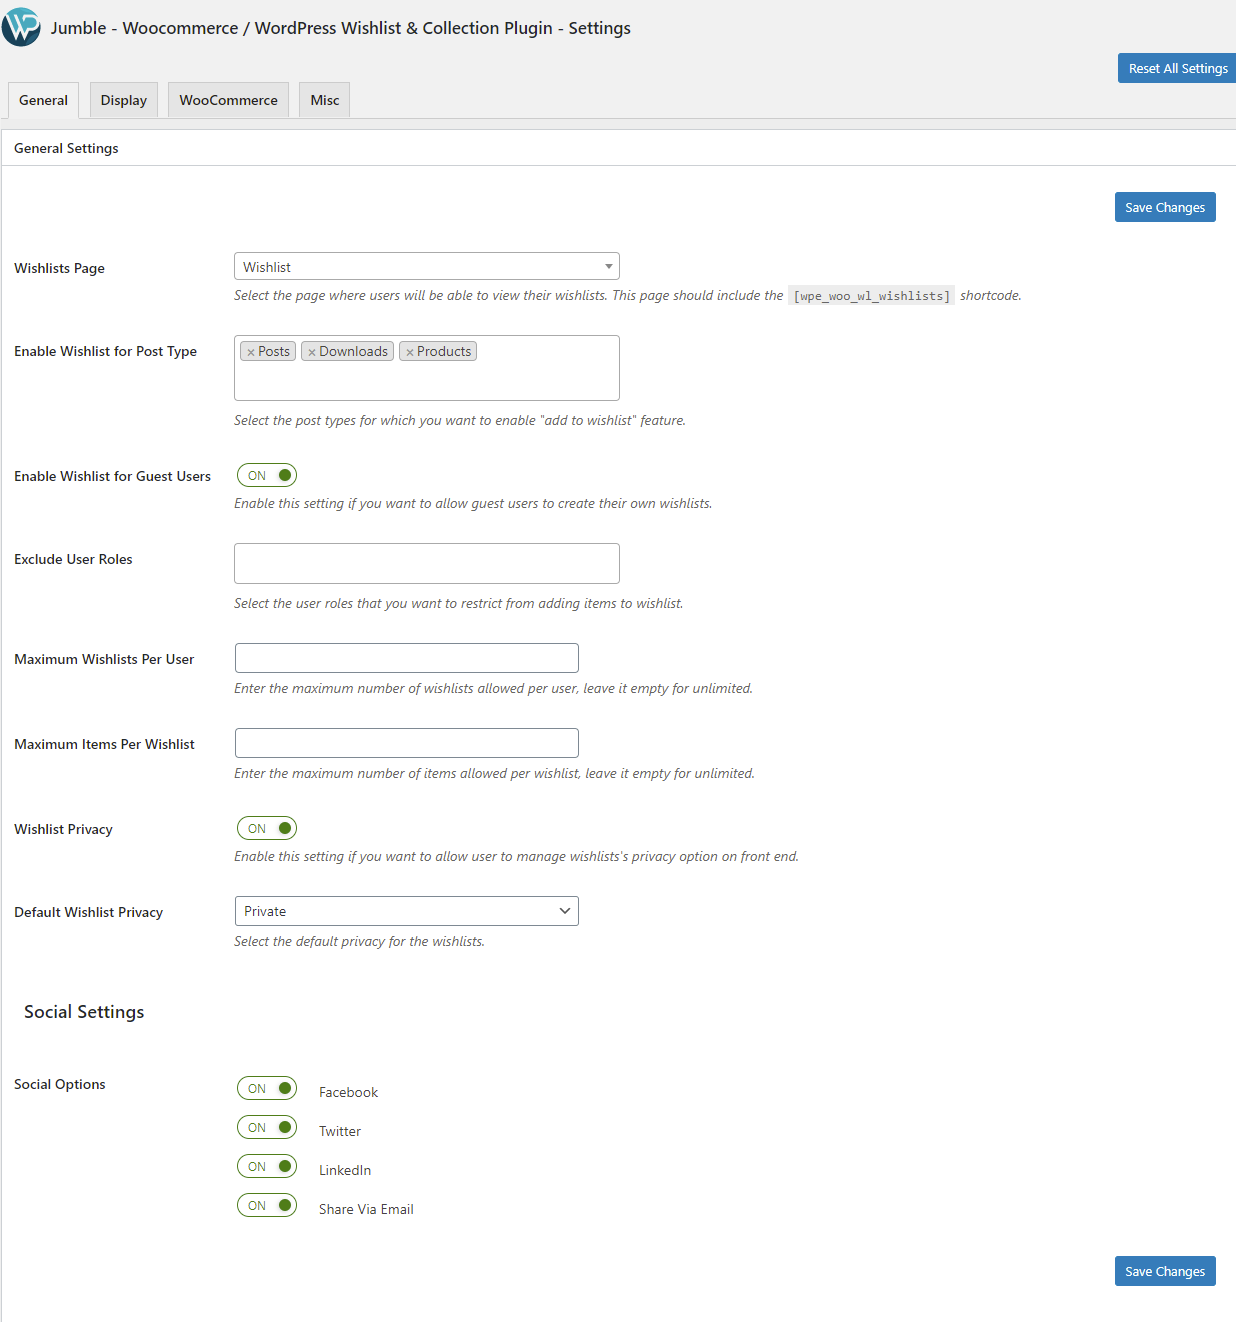
General Settings
Wishlist Page
Select the page where users will be able to view their wishlists. This page should include the [wpe_woo_wl_wishlists] shortcode.
Enable Wishlist for Post Type
Select the post types for which you want to enable "add to wishlist" feature.
Enable Wishlist for Guest Users
Enable this setting if you want to allow guest users to create their own wishlists.
Exclude User Roles
Select the user roles that you want to restrict from adding items to wishlist.
Maximum Wishlists Per User
Enter the maximum number of wishlists allowed per user, leave it empty for unlimited.
Maximum Items Per Wishlist
Enter the maximum number of items allowed per wishlist, leave it empty for unlimited.
Wishlist Privacy
Enable this setting if you want to allow user to manage wishlists's privacy option on front end.
Default Wishlist Privacy
Select the default privacy for the Wishlists.
Social Options
Check each of the sharing options for which you want to enable.
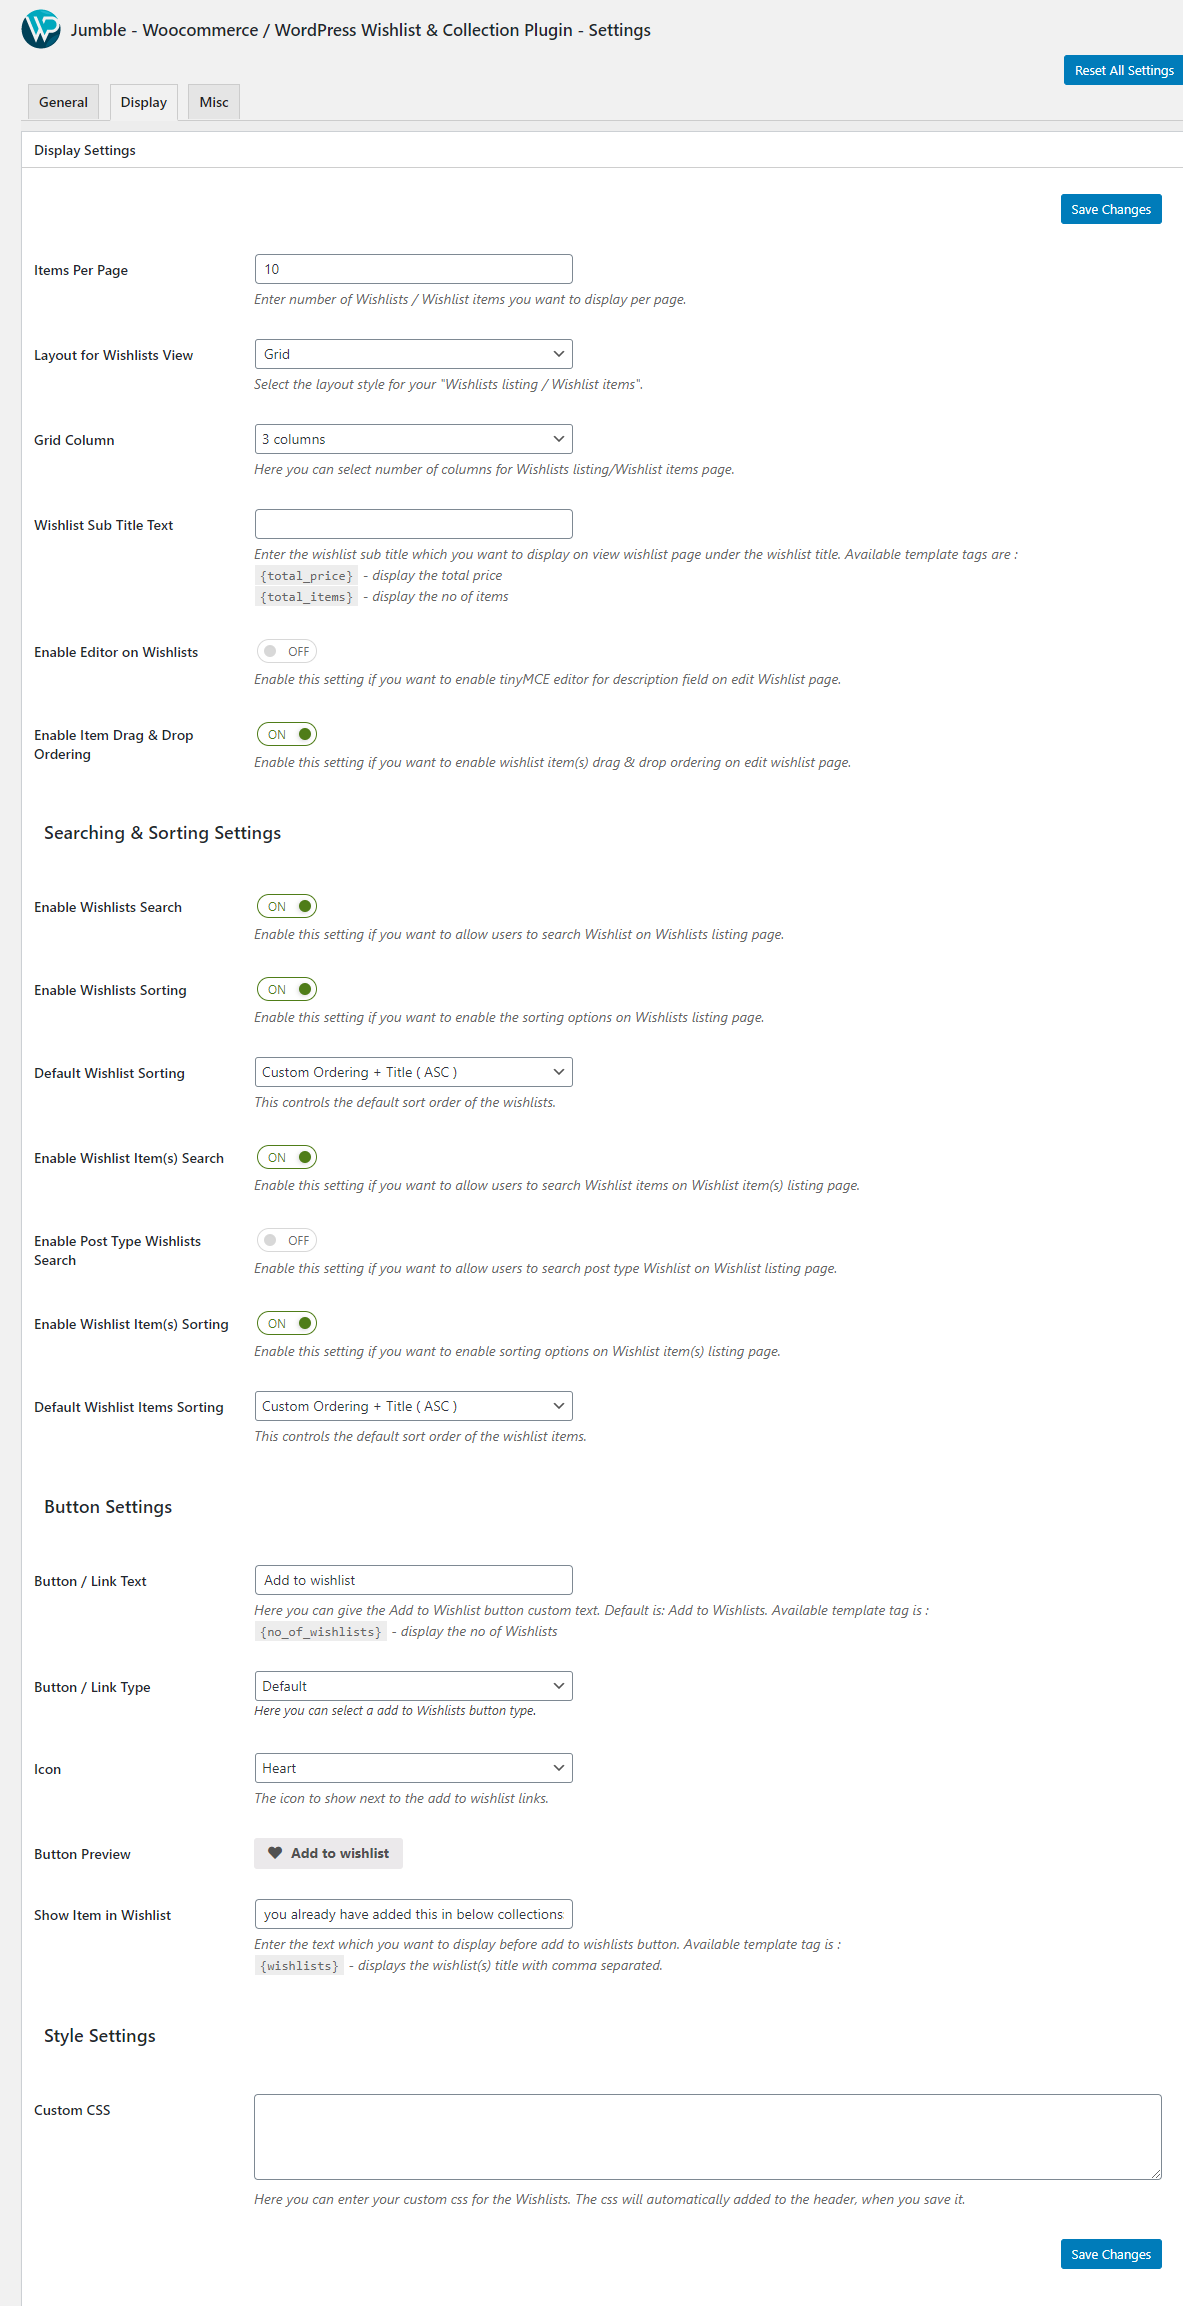
Display Settings
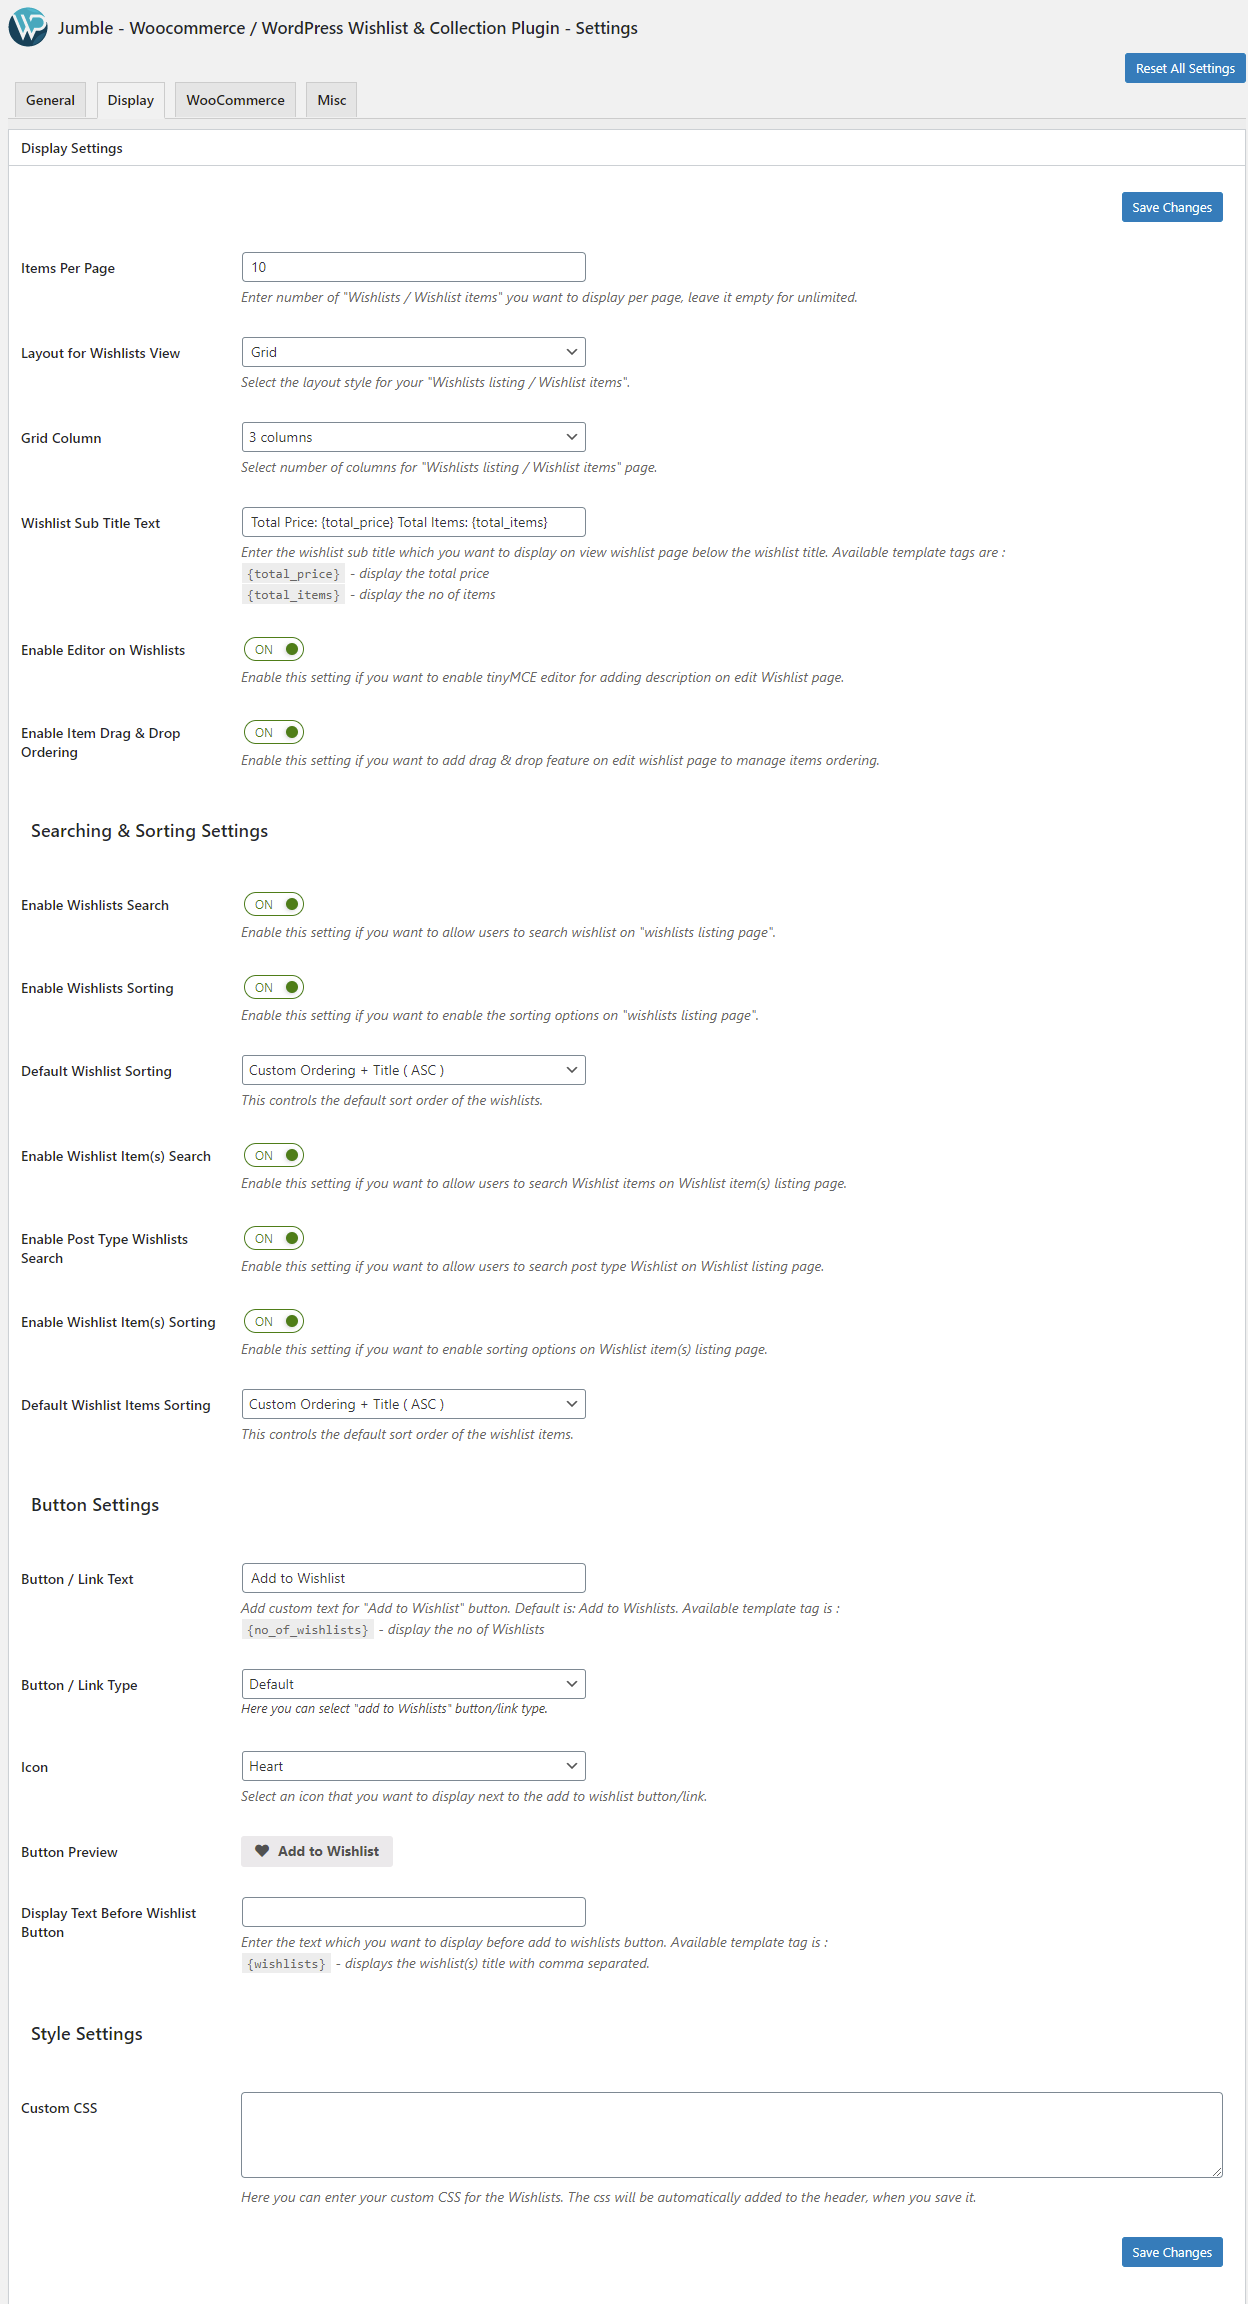
Display Settings
Items per page
Enter number of "Wishlists / Wishlist items" you want to display per page, leave it empty for unlimited.
Layout for Wishlists View
Select the layout style for your "Wishlists listing / Wishlist items".
Grid View
List View
Grid Column
Select number of columns for "Wishlists listing / Wishlist items" page.
Wishlist Sub Title Text
Enter the wishlist sub title which you want to display on view wishlist page below the wishlist title. Available template tags are :
{total_price}- display the total price{total_items}- display the no of items
Enable Editor on Wishlists
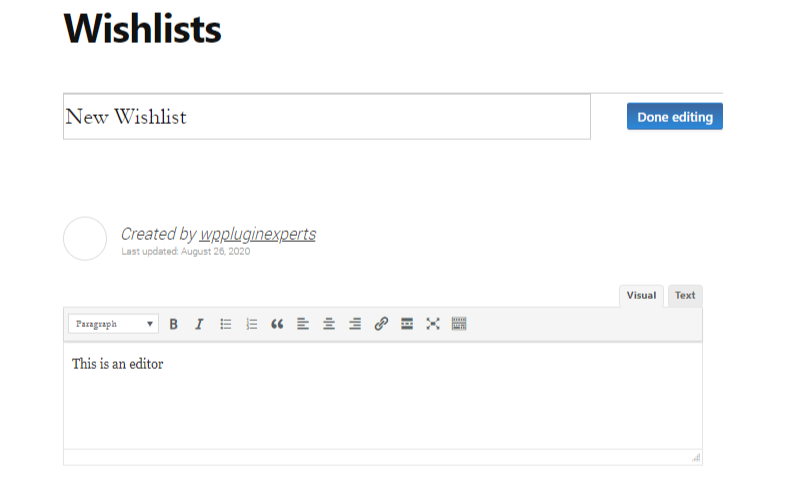
Enable this setting if you want to enable tinyMCE editor for adding description on edit Wishlist page.
Enable Item Drag & Drop Ordering
Enable this setting if you want to add drag & drop feature on edit wishlist page to manage items ordering.
Searching & Sorting Settings
Enable Wishlists Search
Enable this setting if you want to allow users to search wishlist on "wishlists listing page".
Enable Wishlists Sorting
Enable this setting if you want to enable the sorting options on "wishlists listing page".
Default Wishlist Sorting
This controls the default sort order of the wishlists.
Enable Wishlist Item(s) Search
Enable this setting if you want to allow users to search Wishlist items on Wishlist item(s) listing page.
Enable Post Type Wishlists Search
Enable this setting if you want to allow users to search post type Wishlist on Wishlist listing page.
Enable Wishlist Item(s) Sorting
Enable this setting if you want to enable sorting options on Wishlist item(s) listing page.
Default Wishlist Items Sorting
This controls the default sort order of the wishlist items.
Button Settings
Button/Link Text
Add custom text for "Add to Wishlist" button. Default is: Add to Wishlists. Available template tag is : {no_of_wishlists} – display the no of Wishlists
Button/Link Type
Here you can select "add to Wishlists" button/link type.
Icon
The icon to show next to the add to wishlist links.
|
|
|
|
|
|
|
|
|
|
|
|
|
|
|
|
|
|
Button Preview
Display the preview of selected icon.
Display Text Before Wishlist Button
Enter the text which you want to display before add to wishlists button. Available template tag is :
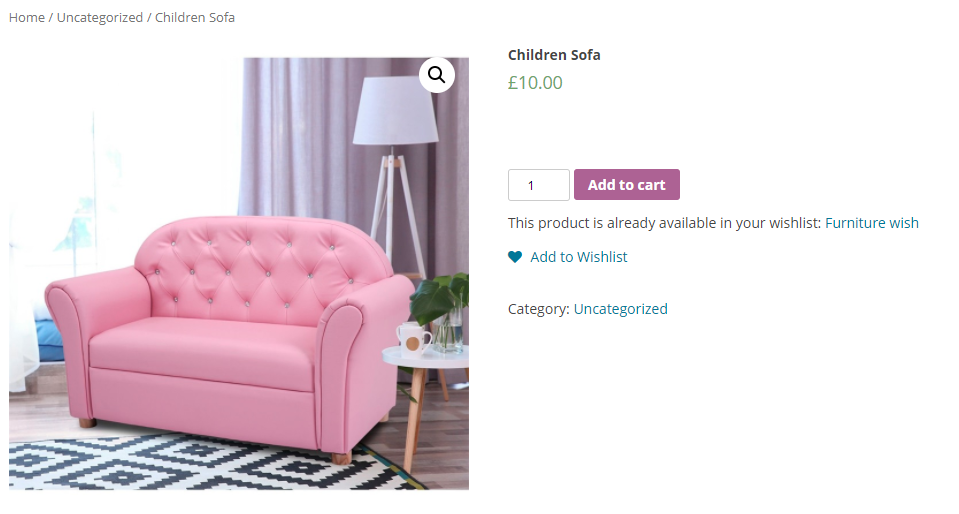
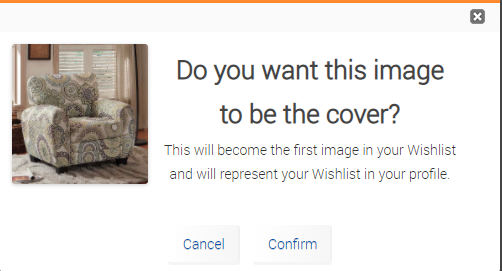
{wishlists} - displays the wishlist(s) title with comma separated in which current product is added, it will look something like the one shown in the image below on frontend.
Style Settings
Custom CSS
Here you can enter your custom CSS for the Wishlists. The css will be automatically added to the header, when you save it.
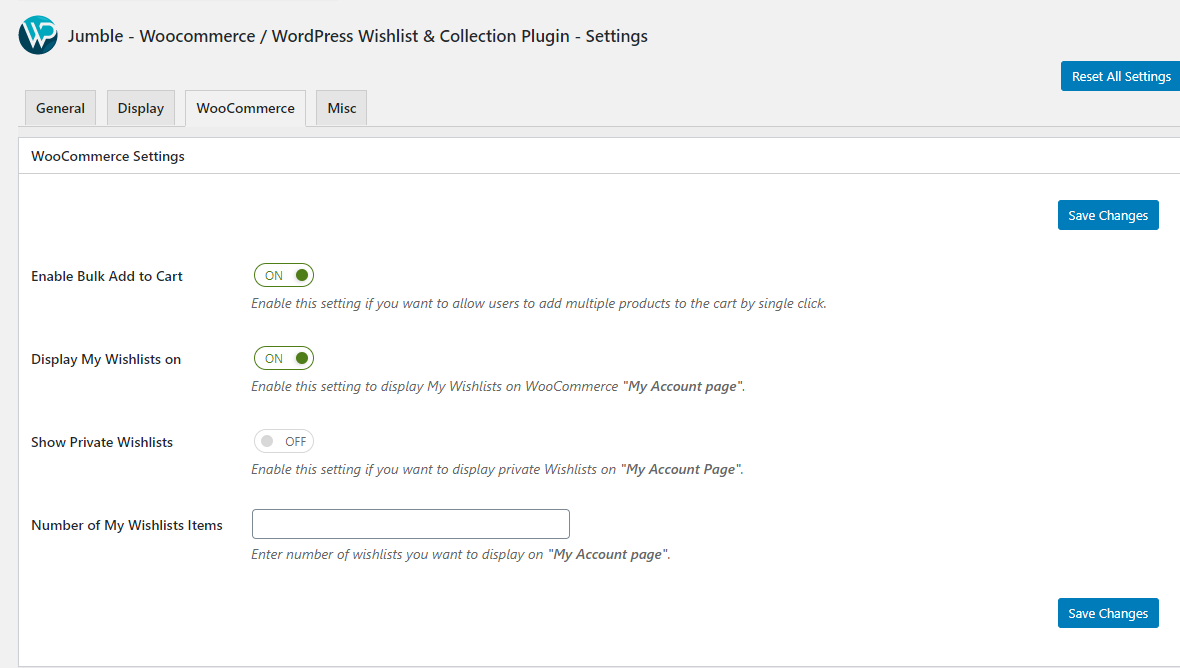
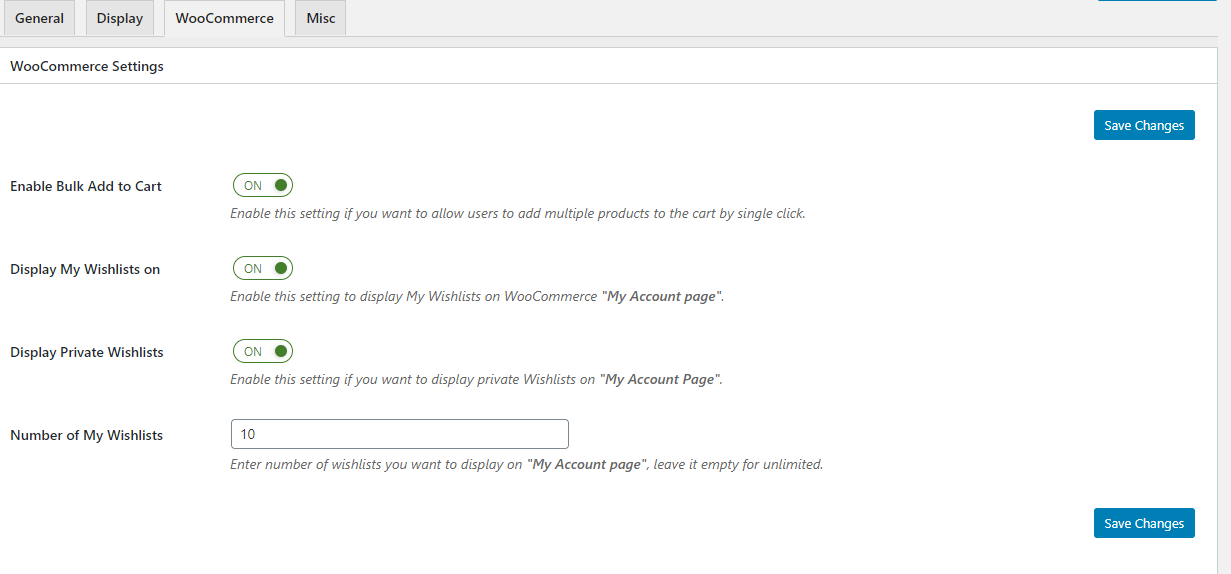
WooCommerce Settings
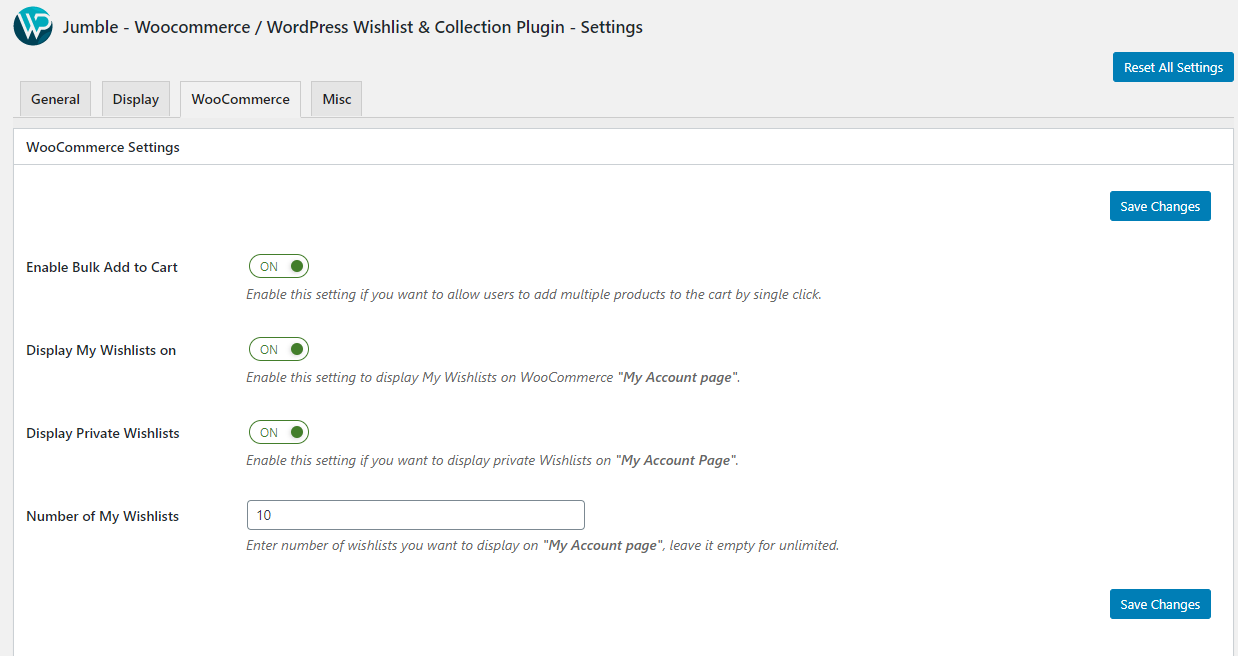
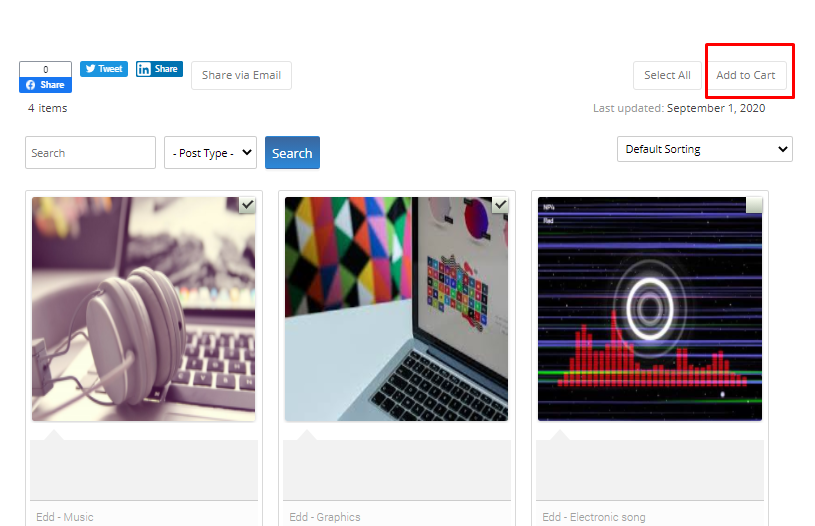
Enable Bulk Add to Cart
Enable this setting if you want to allow users to add multiple products to the cart by single click as shown in the screenshot below.

Display My Wishlists on
Enable this setting to display My Wishlists on WooCommerce "My Account page".
Display Private Wishlists
Enable this setting if you want to display private Wishlists on "My Account Page".
Number of My Wishlists
Enter number of wishlists you want to display on "My Account page", leave it empty for unlimited.
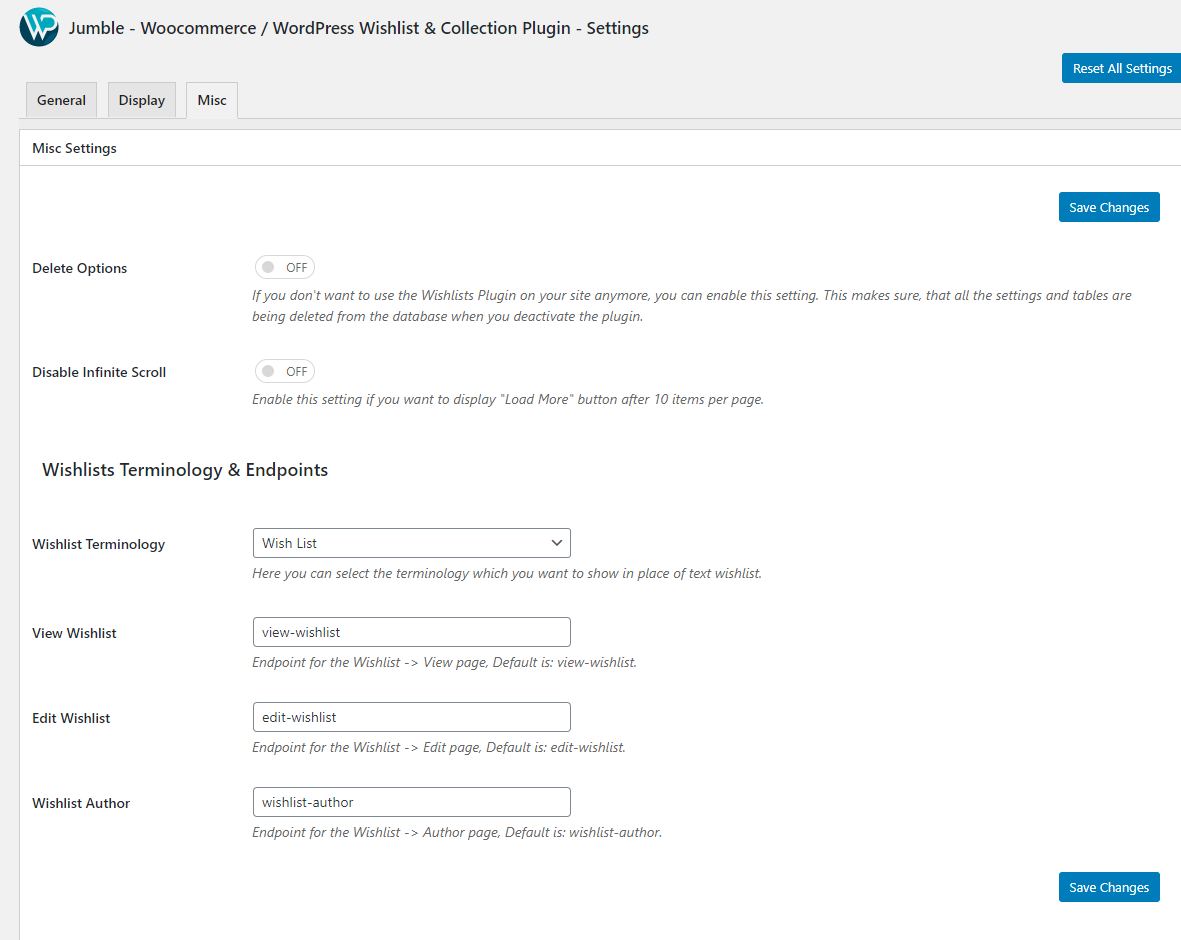
Misc Settings
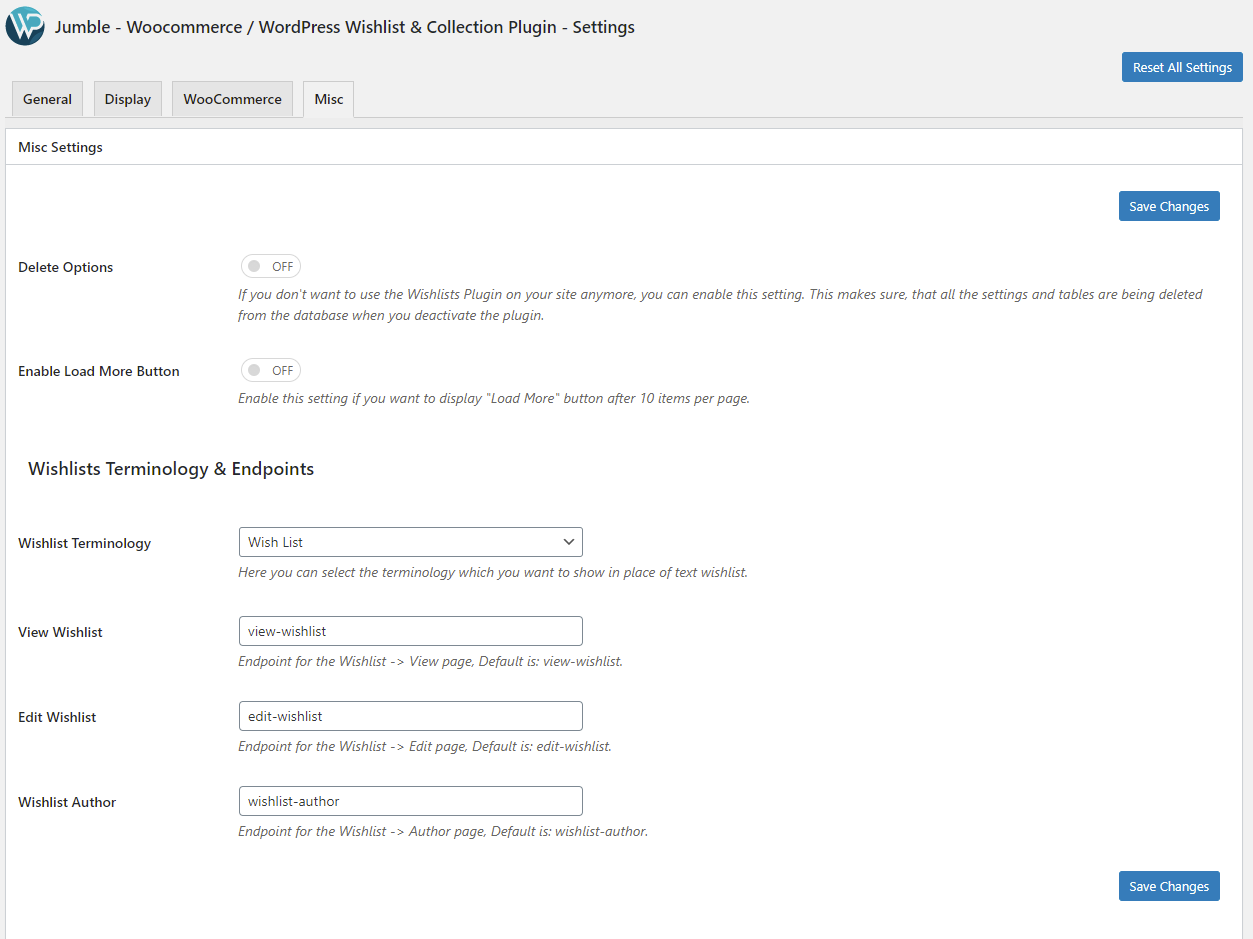
Misc Settings
Delete Options
If you don't want to use the Wishlists Plugin on your site anymore, you can enable this setting. This makes sure, that all the settings and tables are being deleted from the database when you deactivate the plugin.
Enable Load More Button
Enable this setting if you want to display "Load More" button after 10 items per page.
Wishlists Terminology & Endpoints
Wishlist Terminology
Here you can select the terminology which you want to show in place of text wishlist.
View Wishlist
Endpoint for the Wishlist -> View page, Default is: view-wishlist.
Edit Wishlist
Endpoint for the Wishlist -> Edit page, Default is: edit-wishlist.
Wishlist Author
Endpoint for the Wishlist -> Author page, Default is: wishlist-author.
EDD Settings
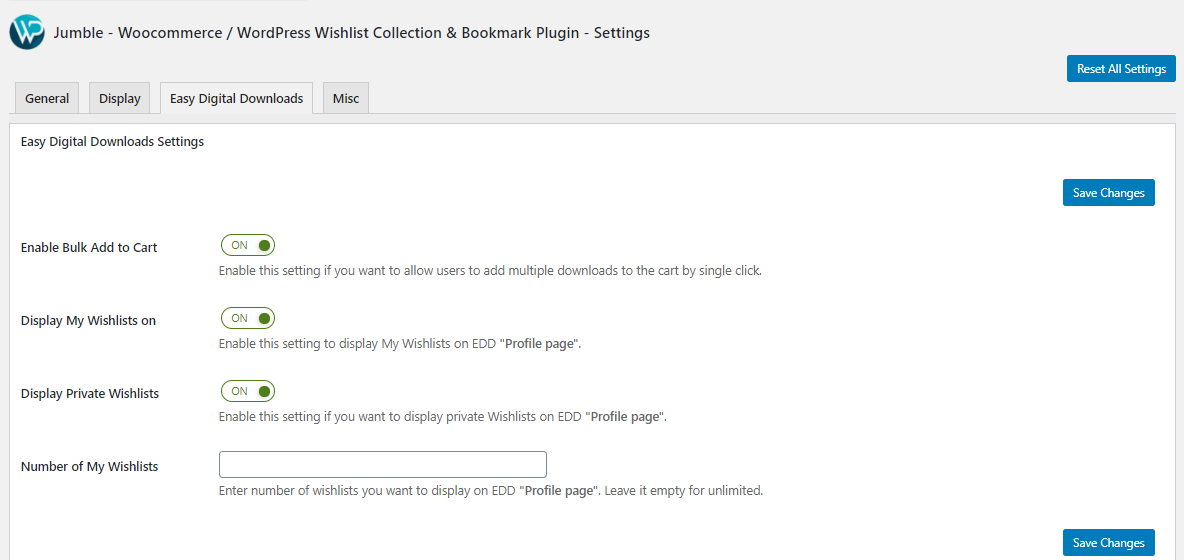
Enable Bulk Add to Cart
Enable this setting if you want to allow users to add multiple downloads to the cart by single click.
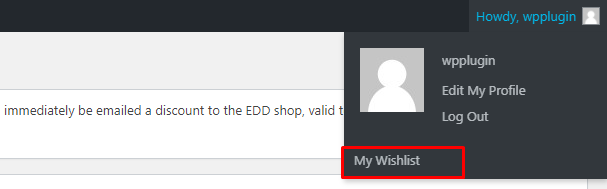
Display My Wishlists on
Enable this setting to display My Wishlists on EDD "Profile page".
Display Private Wishlists
Enable this setting if you want to display private Wishlists on EDD "Profile page".
Number of My Wishlists
Enter number of wishlists you want to display on EDD "Profile page". Leave it empty for unlimited.
User Settings
Few new settings are added to the user edit page ( Users -> All Users -> Edit ) as mentioned in the image below :
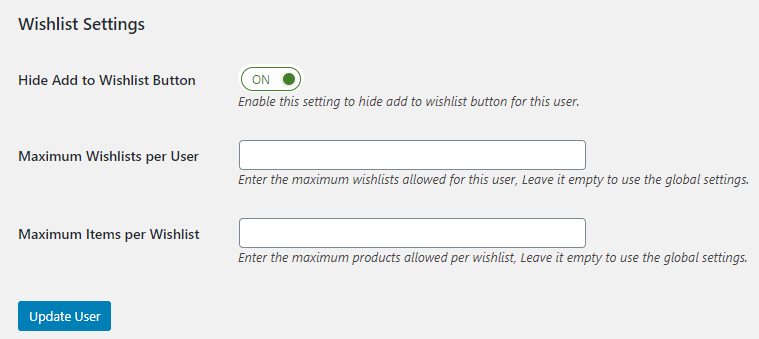
Hide Add to Wishlist Button
Enable this setting to hide add to wishlist button for this user.
Maximum wishlists per user
Enter the maximum wishlists allowed for this user, Leave it empty to use the global settings.
Maximum products per wishlist
Enter the maximum products allowed per wishlist, Leave it empty to use the global settings.
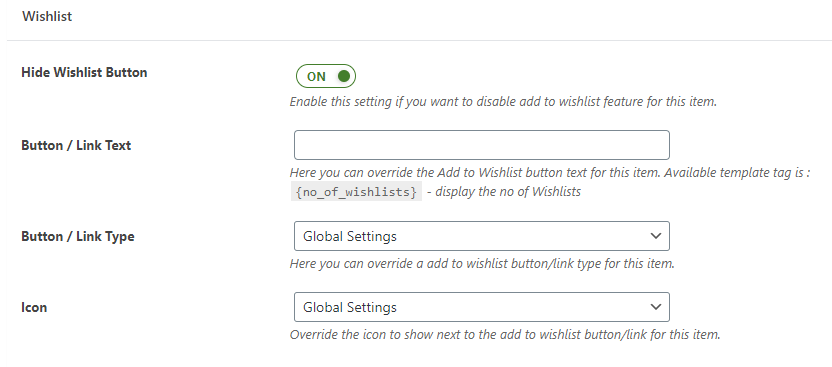
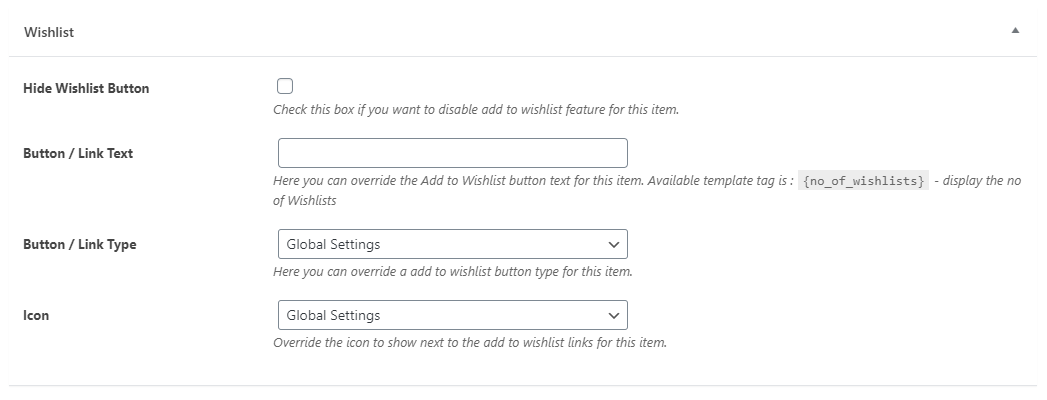
Metabox Settings
Metabox Settings for Custom Post Types
Metabox Settings for WooCommerce Products
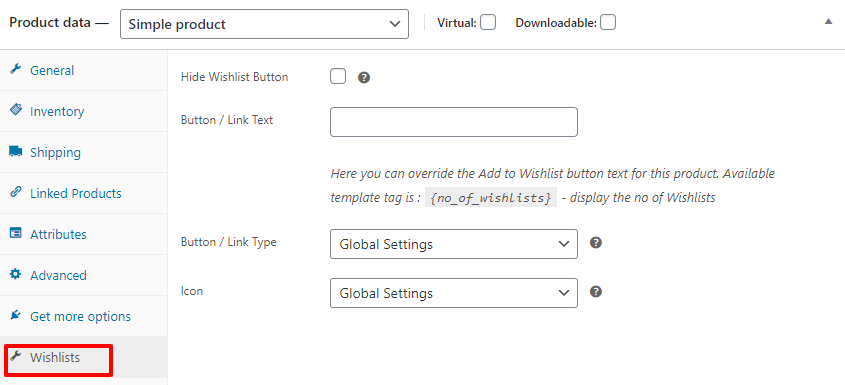
Hide Wishlist Button
Enable this setting if you want to disable add to wishlist feature for this item.
Button/Link Text
Here you can override the Add to Wishlist button text for this item. Available template tag is : {no_of_wishlists} - display the no of Wishlists
Button/Link Type
Here you can override a add to wishlist button/link type for this item.
Icon
Override the icon to show next to the add to wishlist button/link for this item.
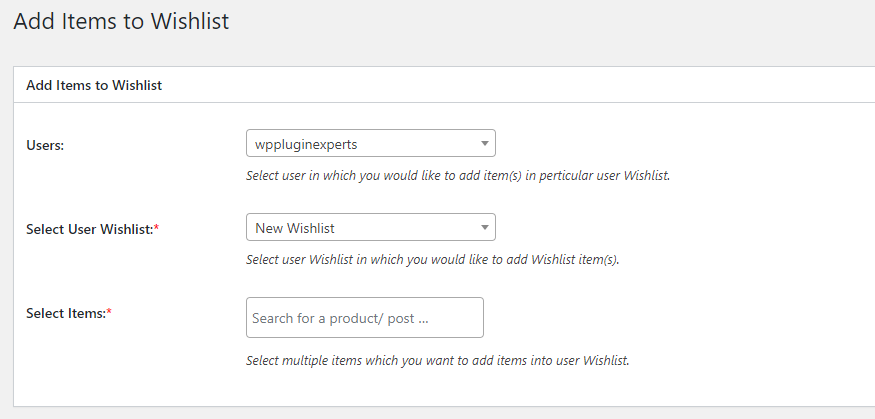
Admin Add to Wishlist
Below image shows, allow admin to add product(s) to wishlist for a user :
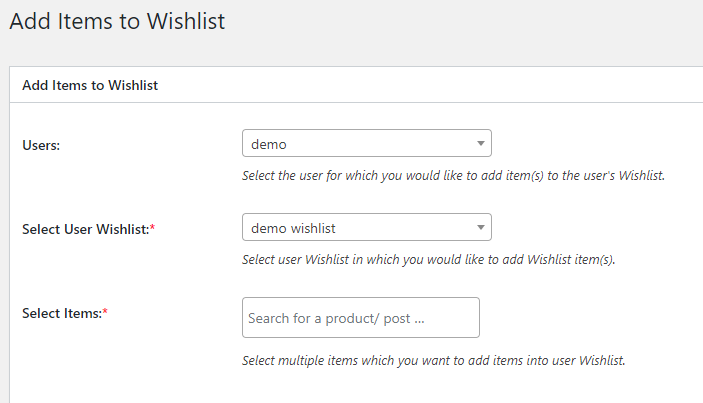
Users
Select the user for which you would like to add item(s) to the user's Wishlist.
Select User Wishlist
Select user Wishlist in which you would like to add Wishlist item(s).
Select items
Select multiple items which you want to add items into user Wishlist.
Adding a Shortcode
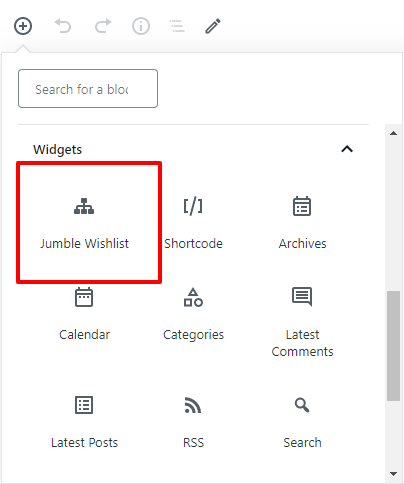
To integrate wishlists into any page or post at any position you can use the shortcodes. You will see a Wishlist icon within the WordPress classic editor, just as shown in the image below:
With Gutenberg editor, it will look like as shown in the screenshot below.
Click on the icon and the custom settings will appears as mentioned below.
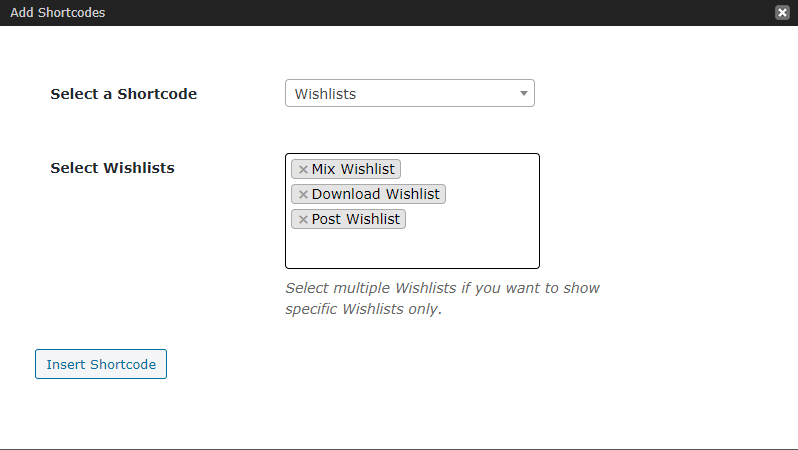
Wishlist Shortcode
The [wpe_woo_wl_wishlists] shortcode can be used on any post, page or product. It provides a quick and easy way to allow customers to add any product to a wishlist. classic editor, it will look like as shown in the screenshot below.
With Gutenberg editor, it will look like as shown in the screenshot below.
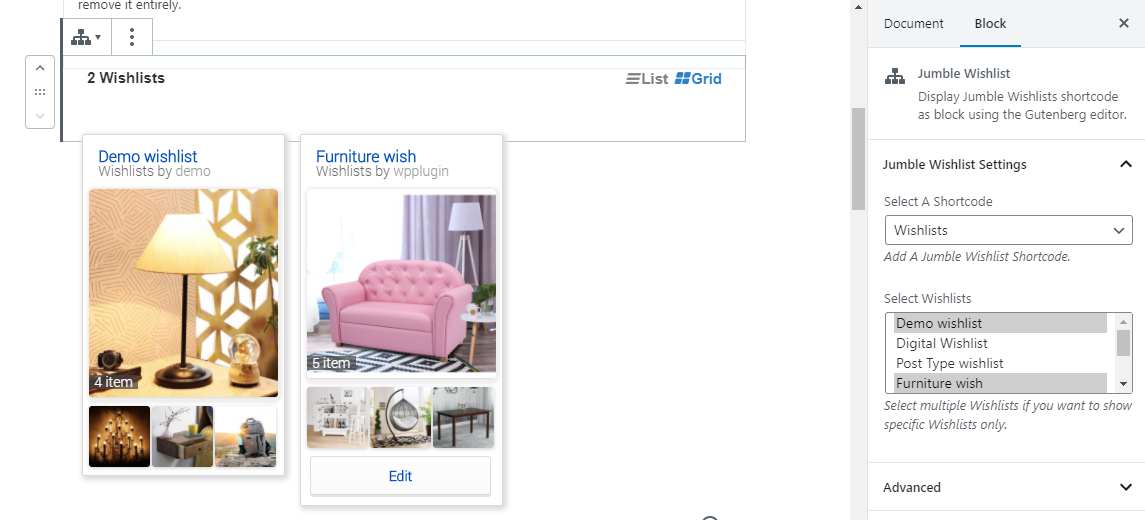
Select A Shortcode
Add A Jumble Wishlist Shortcode.
Select Wishlists
Select multiple Wishlists if you want to show specific Wishlists only.
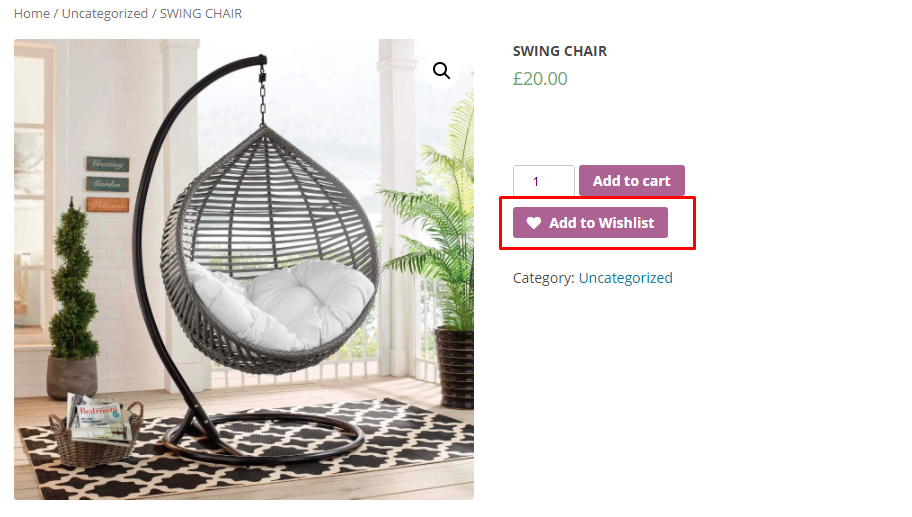
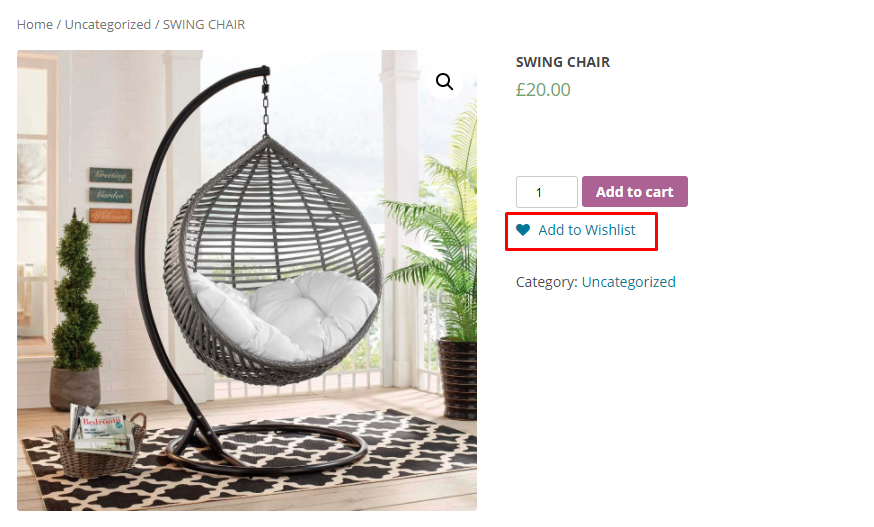
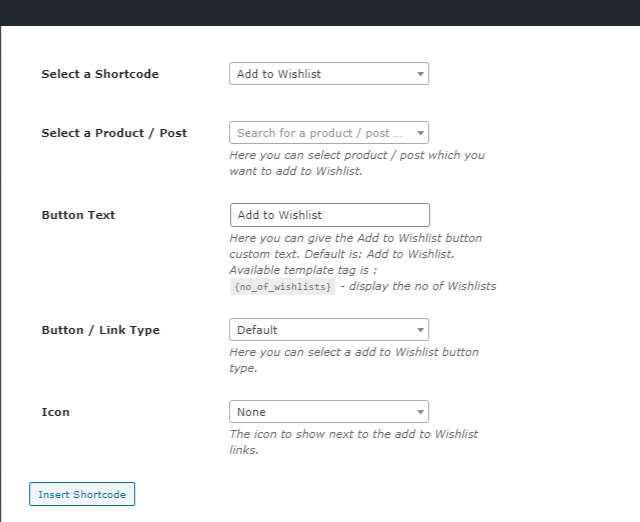
Add To Wishlist Shortcode
With classic editor, it will look like as shown in the screenshot below.
With Gutenberg editor, it will look like as shown in the screenshot below.
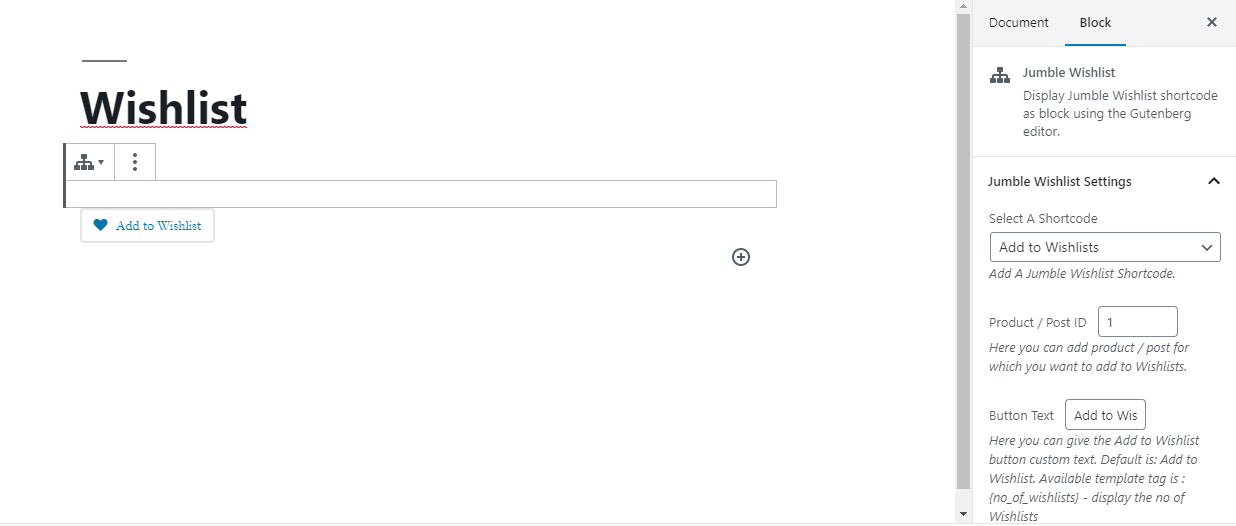
Product ID
Here you can select product which you want to add to wishlist.
Button Text
Here you can give the Add to Wishlist button custom text. Default is: Add to Wishlist.
Button / Link Type
Here you can select a add to Wishlist button type.
Icon
The icon to show next to the add to Wishlist links.
Insert Shortcode
After you entered all the information you want, click on the "Insert Shortcode" button and the shortcode will be entered in to the normal WordPress editor with all you custom settings. Now you only need to save/update your post and the "add to wishlist" Button is done and ready.
Add to wishlist button Frontend
After inserted shortcode it will look something like the one shown in the image below on frontend.
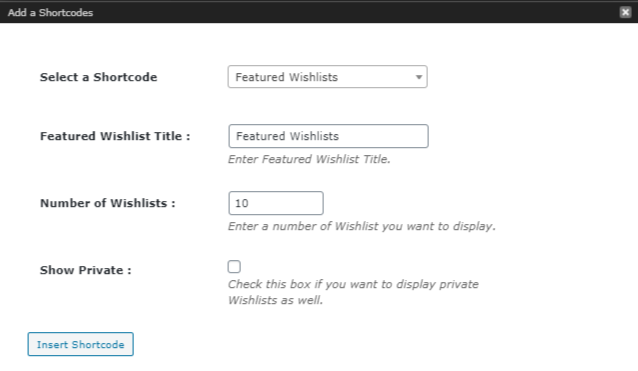
Featured Wishlists Shortcode
With classic editor, it will look like as shown in the screenshot below.

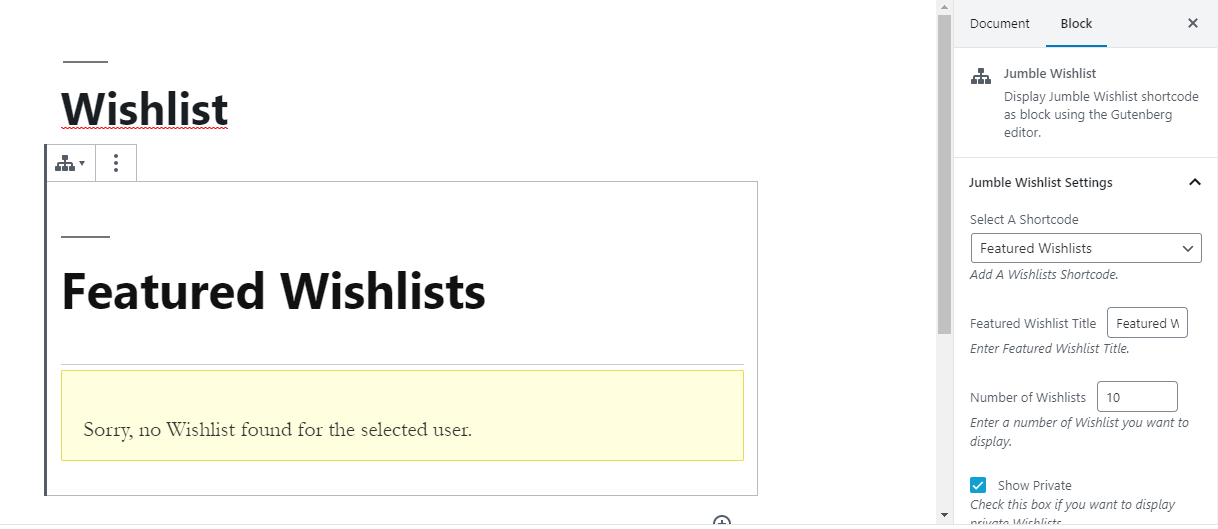
With Gutenberg editor, it will look like as shown in the screenshot below.

Featured Wishlist Title
Here you can enter Featured Wishlist Title.
Number of Wishlists
Here you can Enter a number of Wishlist you want to display.
Show Private
Check this box if you want to display private Wishlists.
Insert Shortcode
After you entered all the information you want, click on the "Insert Shortcode" button and the shortcode will be entered in to the normal WordPress editor with all you custom settings. Now you only need to save/update your post and the Featured Wishlist is done and ready.
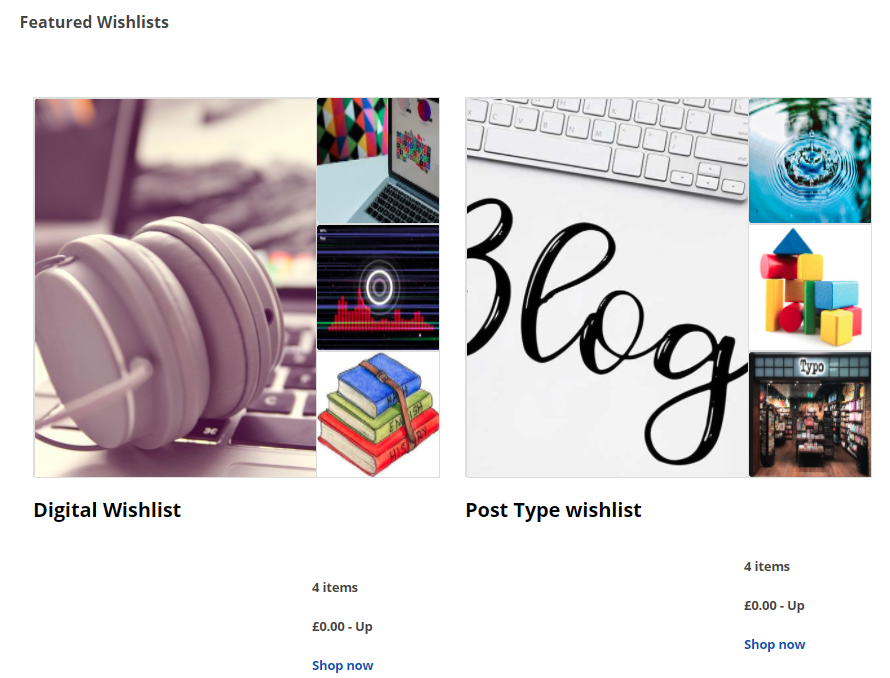
Featured Wishlists On Frontend
After inserted shortcode it will look something like the one shown in the image below on frontend.
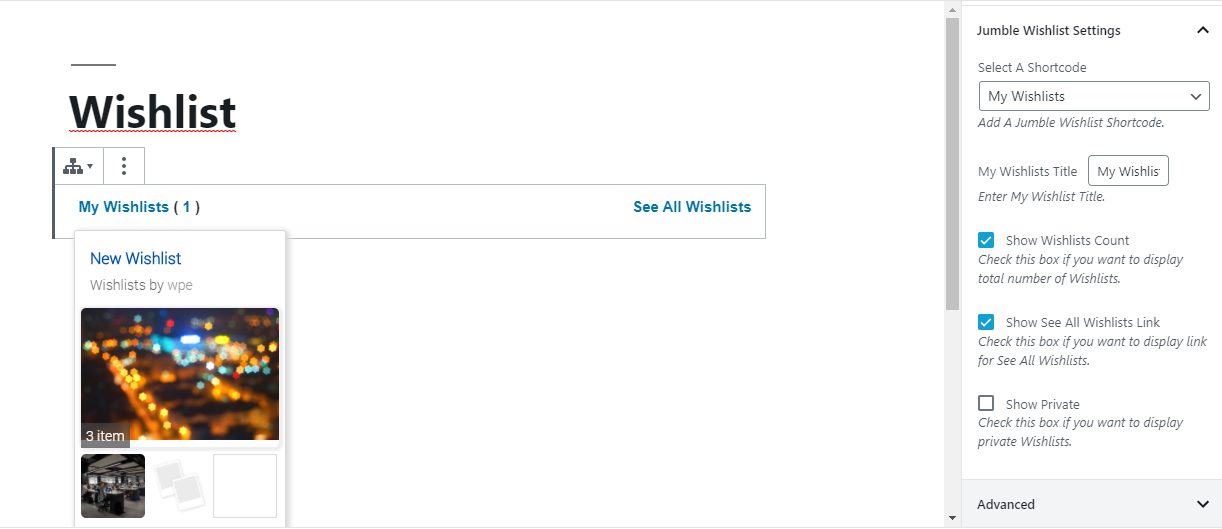
My Wishlists Shortcode
With classic editor, it will look like as shown in the screenshot below.
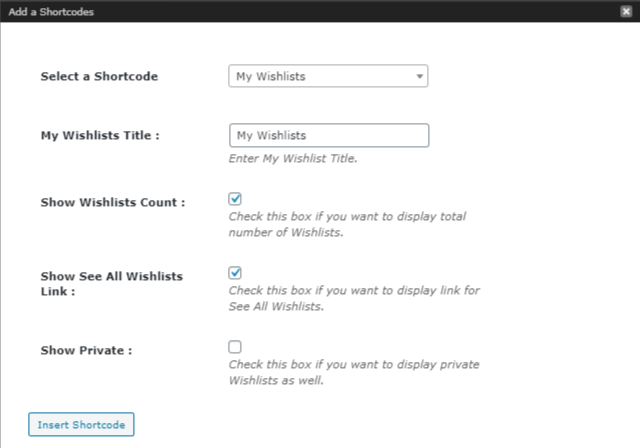
With Gutenberg editor, it will look like as shown in the screenshot below.
My Wishlists Title
Here you can enter My Wishlist Title.
Show Wishlists Count
Check this box if you want to display total number of Wishlists.
Show See All Wishlists Link
Check this box if you want to display link for See All Wishlists.
Show Private
Check this box if you want to display private Wishlists.
Insert Shortcode
After you entered all the information you want, click on the "Insert Shortcode" button and the shortcode will be entered in to the normal WordPress editor with all you custom settings. Now you only need to save/update your post and the My Wishlist is done and ready.
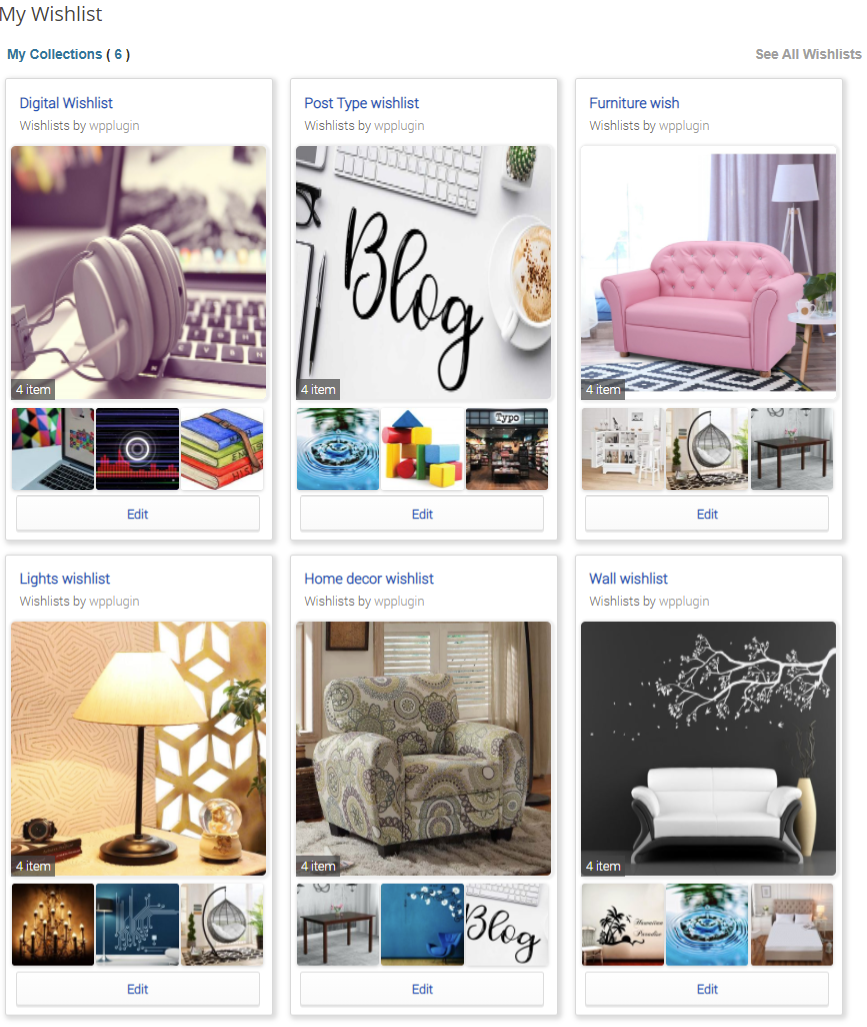
My Wishlists On Frontend
After inserted shortcode it will look something like the one shown in the image below on frontend.
Wishlist End User Documentation/Overview
This section of the guide provides an overview of the features provided by the WooCommerce Wishlists extension to users using your site.
Creating a wishlist
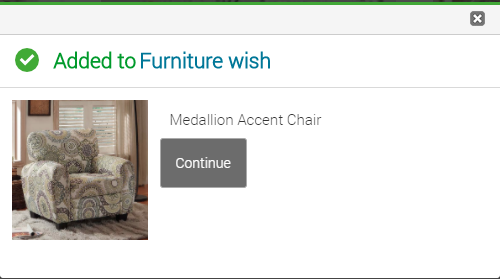
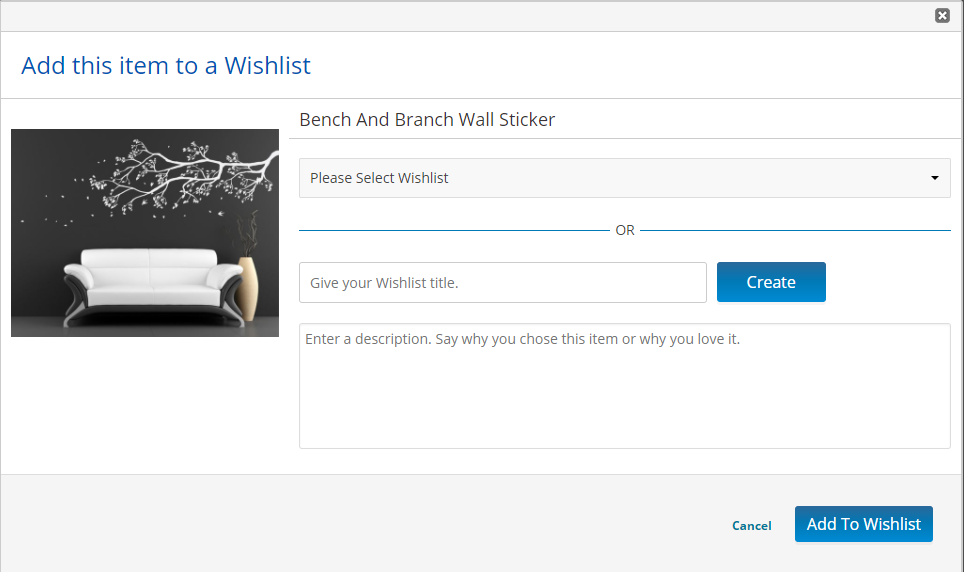
Customers can always create a wishlist on the fly while adding a Items to their wishlist.
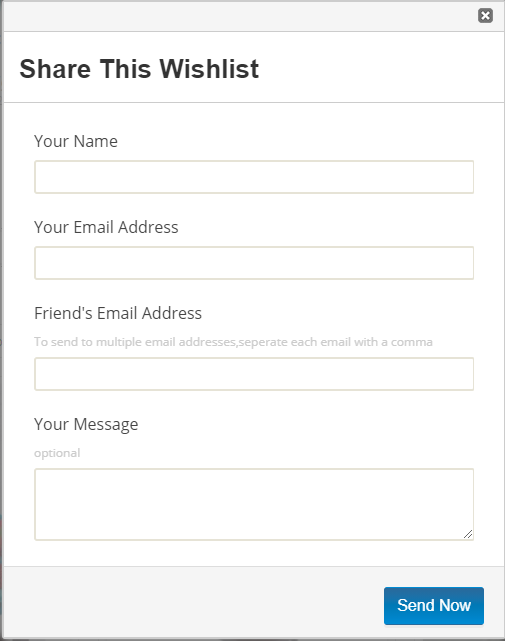
Private wishlists are only viewable to the user that created it, and public wishlists are viewable by anyone. Public wishlists also include sharing buttons and a sharing link.
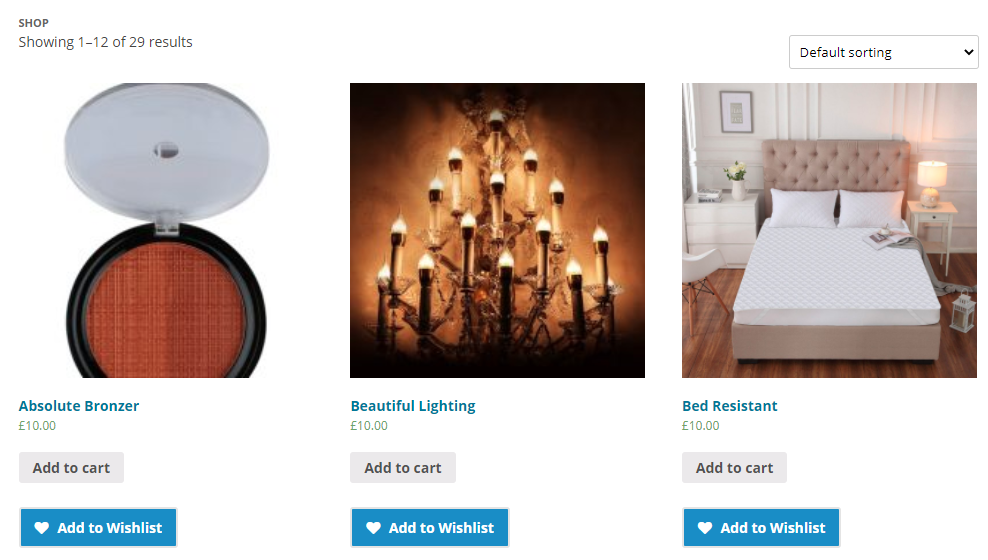
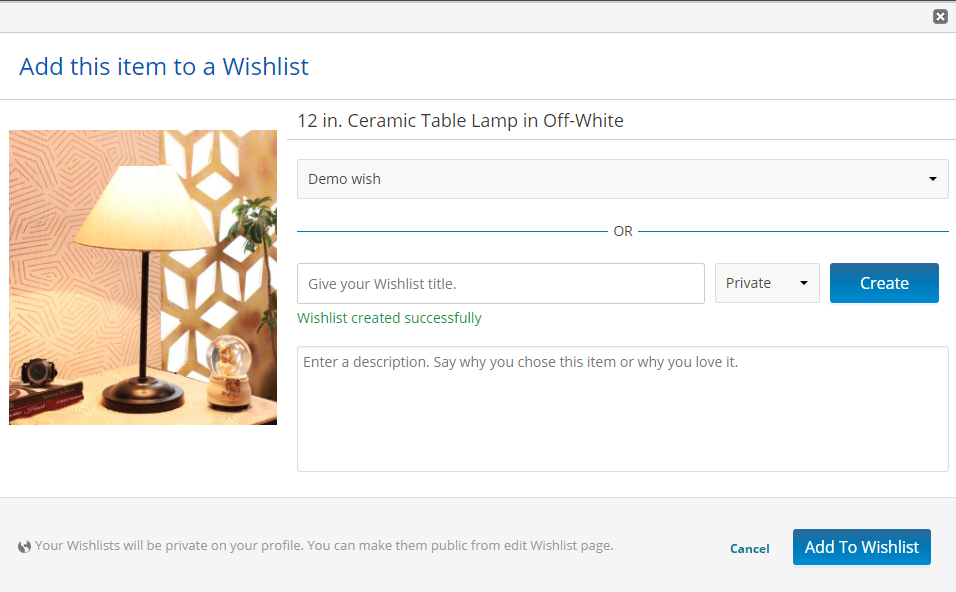
Adding Items to a Wishlist
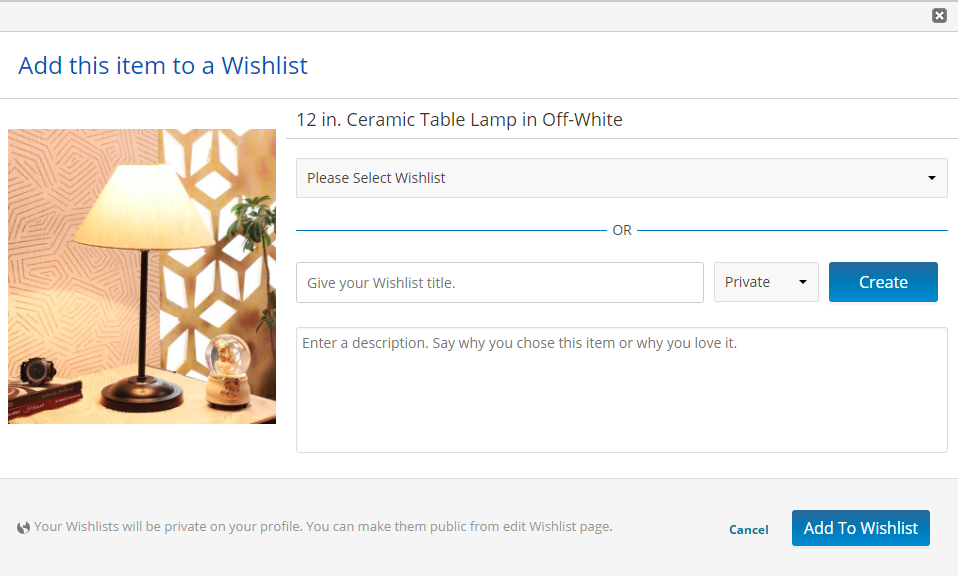
By default, an "Add to wishlists" link will appear on items page, shop page and archive pages. When this link is clicked, a modal window will appear. Your customers will be able to add a Item to one of their wishlists, or create a new wishlist, all without leaving the current page.
Where variable product is shown, customers can simply select the variation option they are interested in, and click the "add to wishlist" button.
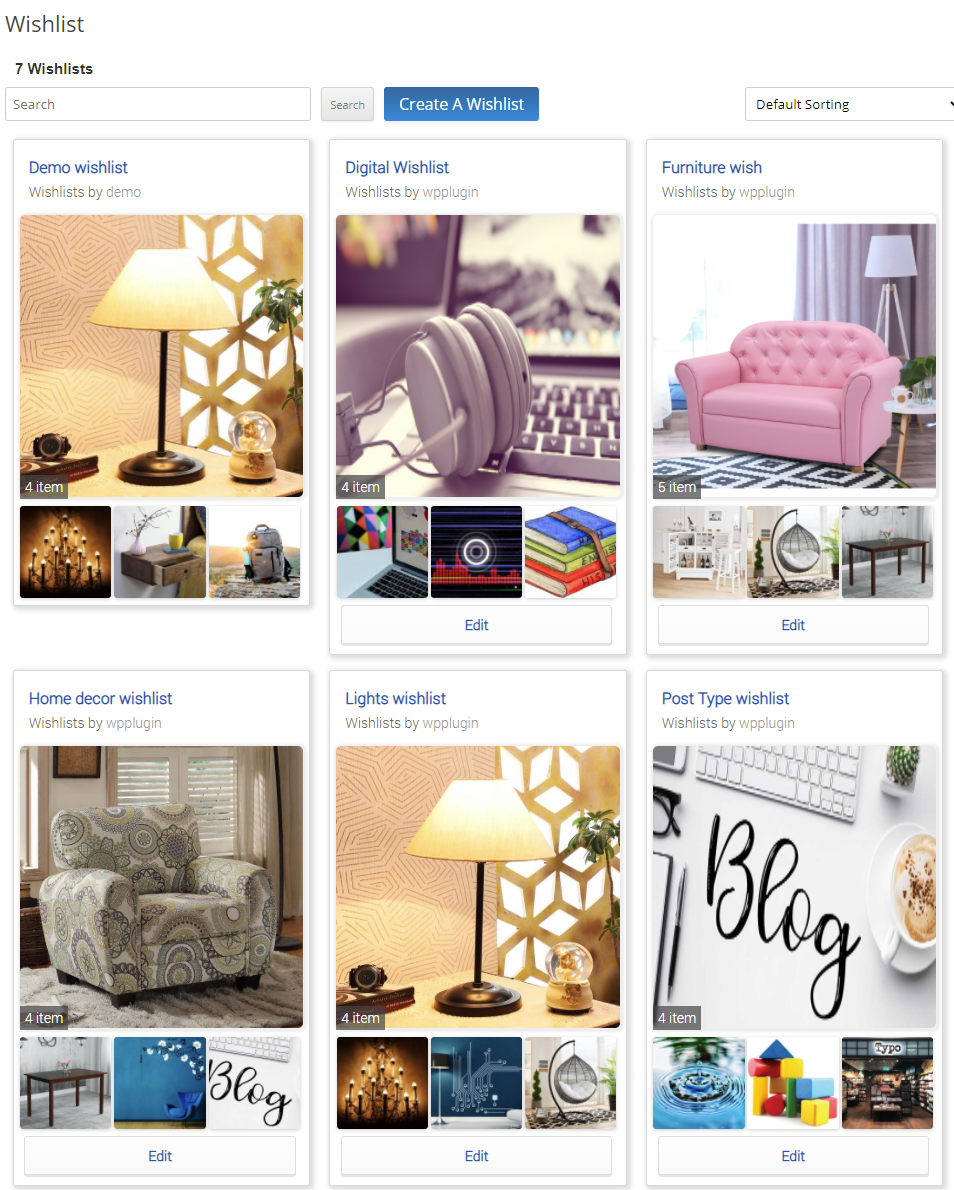
Manage your wishlists
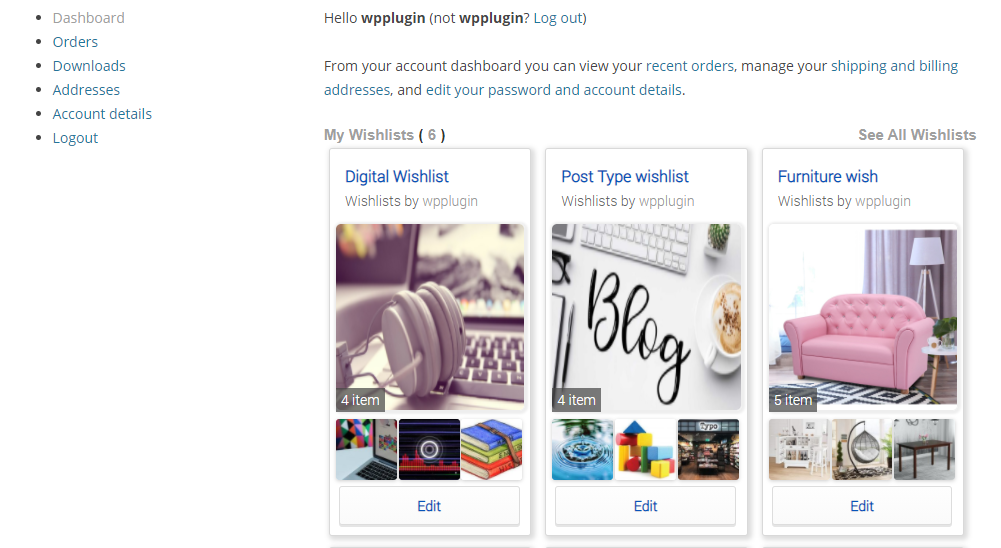
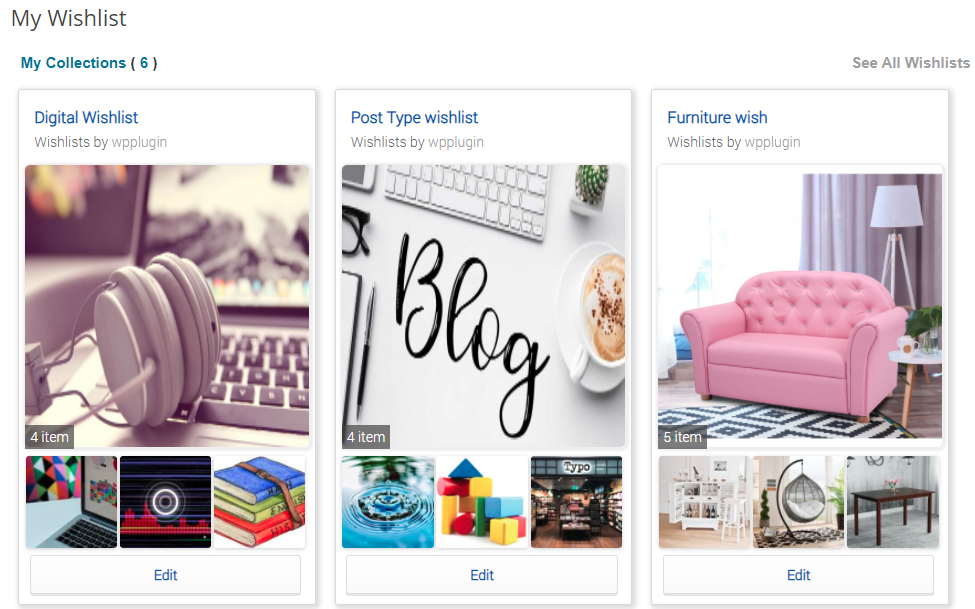
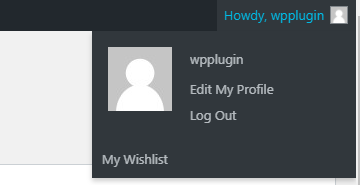
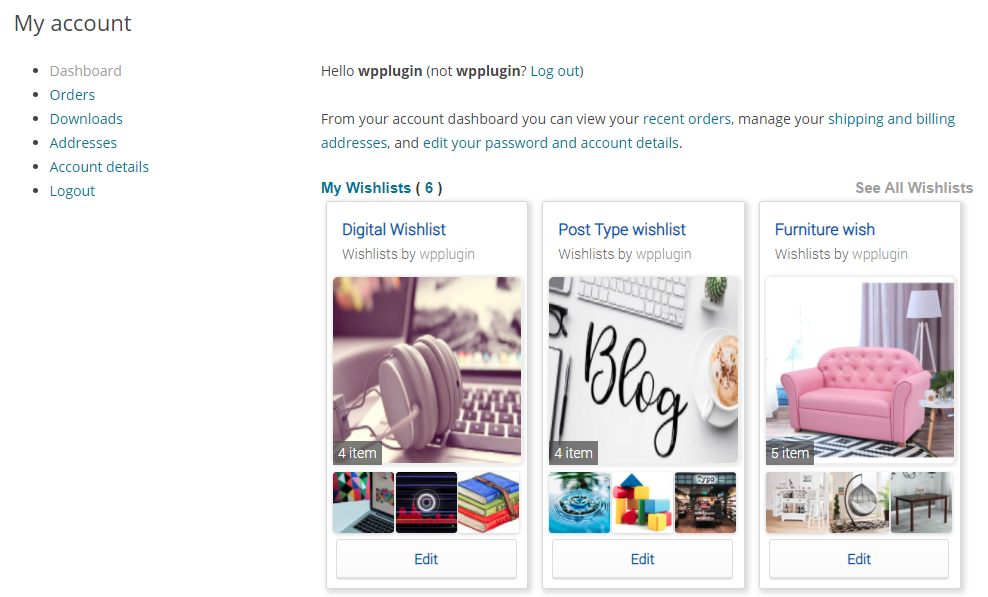
You can view and manage your wishlists from two different sections of the site.
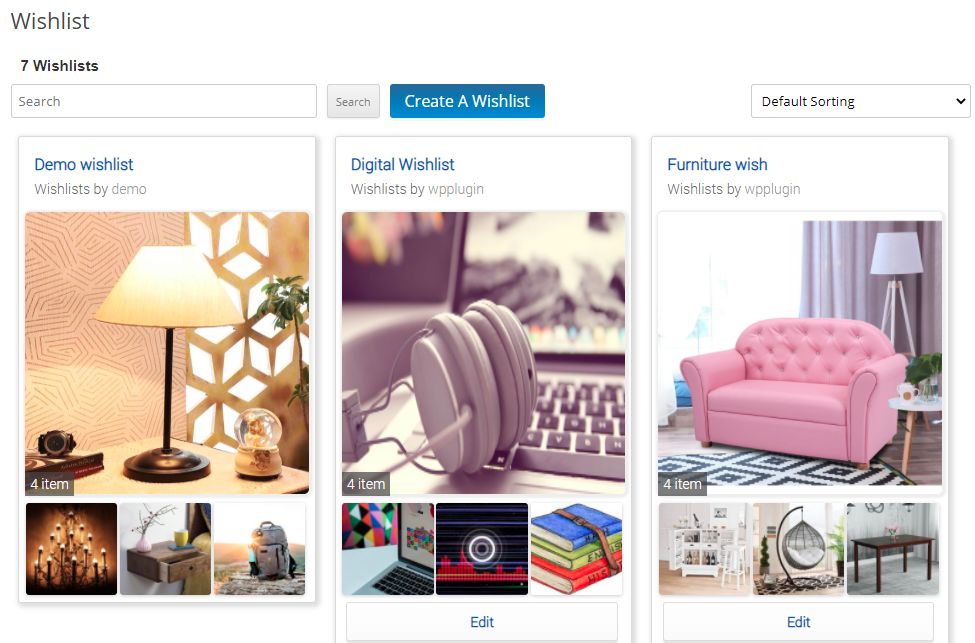
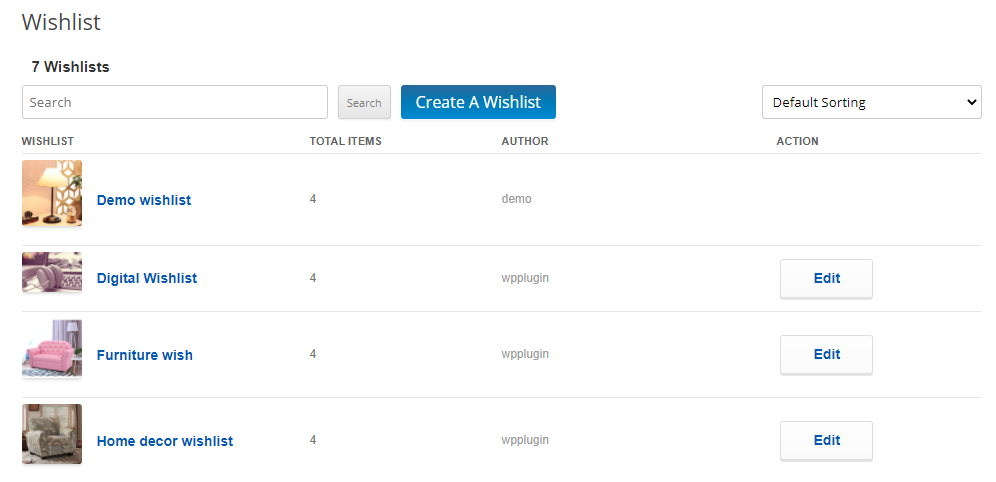
1) If you are logged into your account on the site you will see the wishlists available from your "My Account" page as mentioned in the image below:
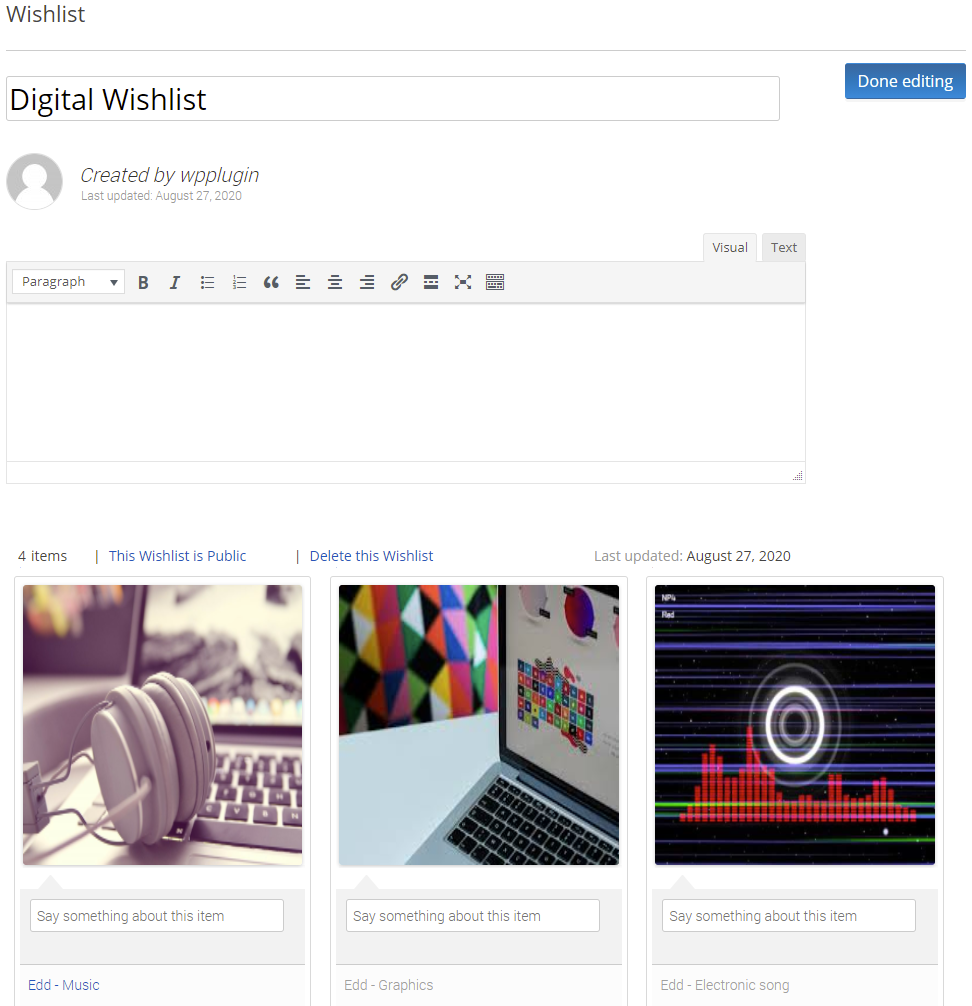
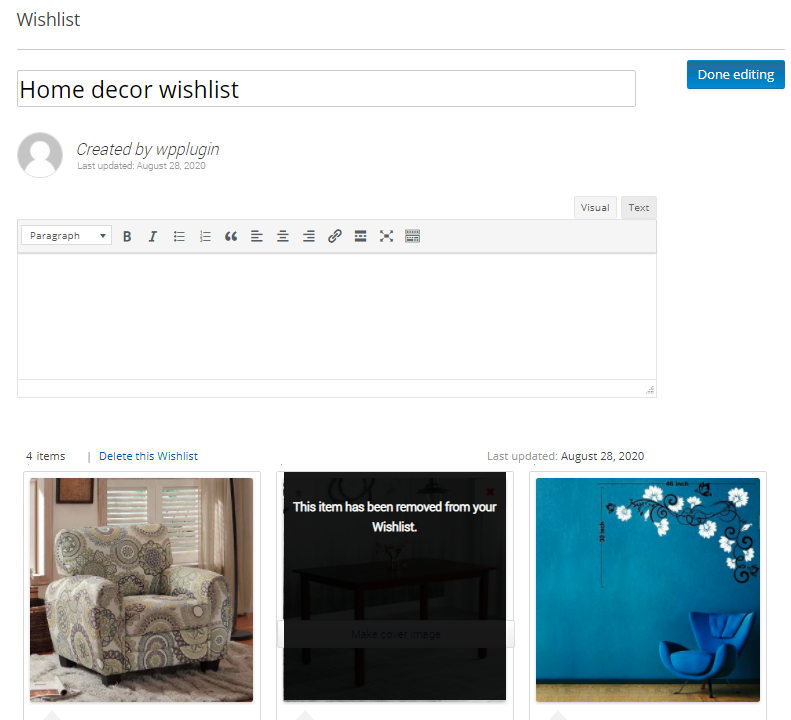
Editing a wishlist
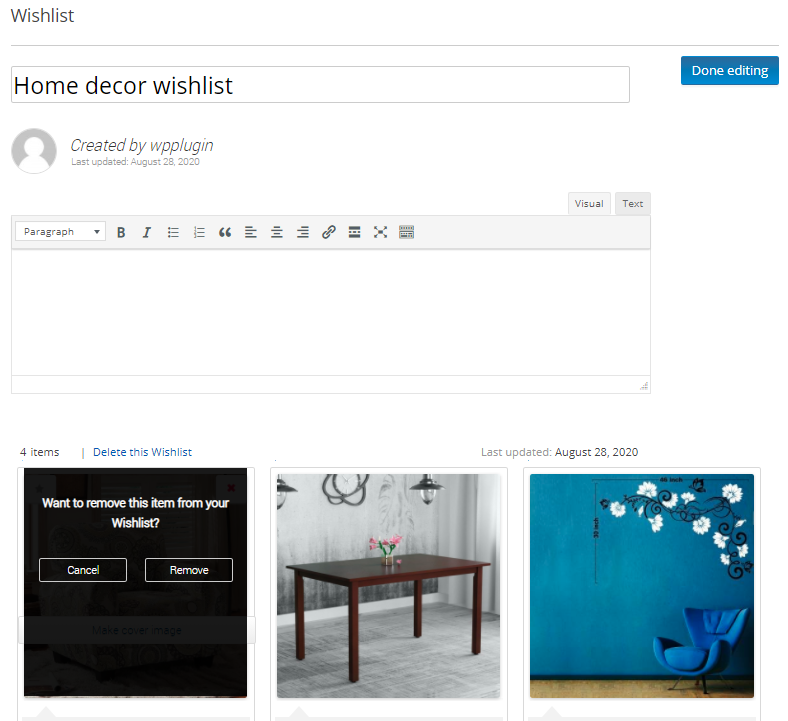
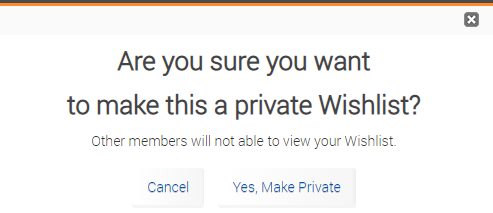
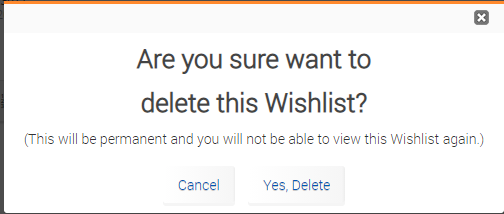
To make changes to a wishlist, click Edit. You can change the title, add or edit a description, make it private, or delete it. When deleting a wishlist, the user is asked for confirmation.
Screenshots
Shows integration with the default WordPress 2012 theme


Jumble – Woocommerce / WordPress Wishlist Collection & Bookmark Demo
You can view a demo of the Jumble – Woocommerce / WordPress Wishlist Collection & Bookmark plugin here: Jumble - Woocommerce / WordPress Wishlist Collection & Bookmark Demo
By: wppluginexperts
Email: [email protected]